

Distribute documents to investors via group share method
Introduction Fund managers often need to share important updates and documents with investors quickly, securely, and at scale. To streamline this process,
Introduction
Fund managers often need to share important updates and documents with investors quickly, securely, and at scale. To streamline this process, we introduce a workflow that is tailored for cases where you need to share documents with a group of common recipients. For example, you can upload documents X, Y, and Z, and share them all at once with selected investment entities.
From uploading files and assigning document types to narrowing down recipients by communication types and customizing notification preferences, this guide will walk you through each step to help you distribute documents to investors with confidence and clarity.
Guideline
Where to find this feature?
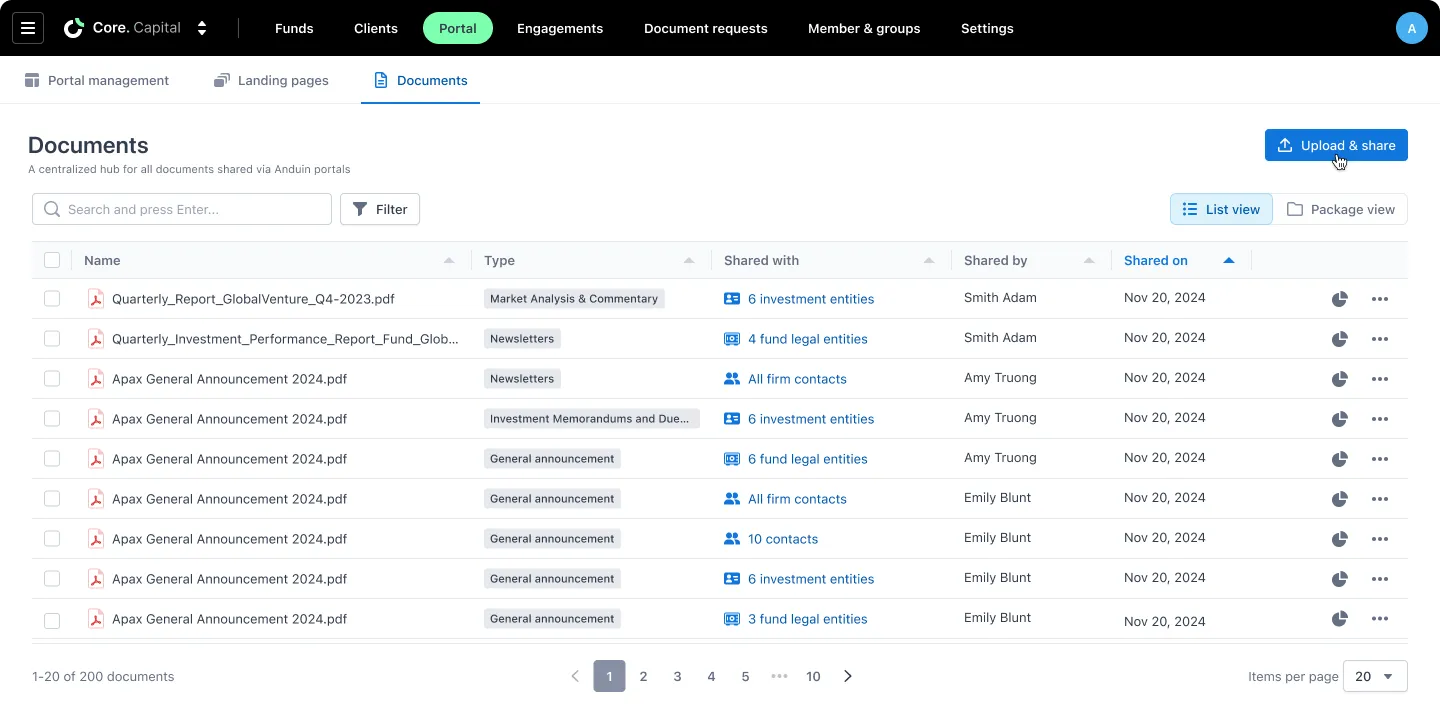
Go to the "Documents" tab under the main “Portals” tab in IDM. Then, in the document dashboard, click the
Upload & Sharebutton on the top right of the screen to get started.
Step 1: Name your document package & choose a sharing method
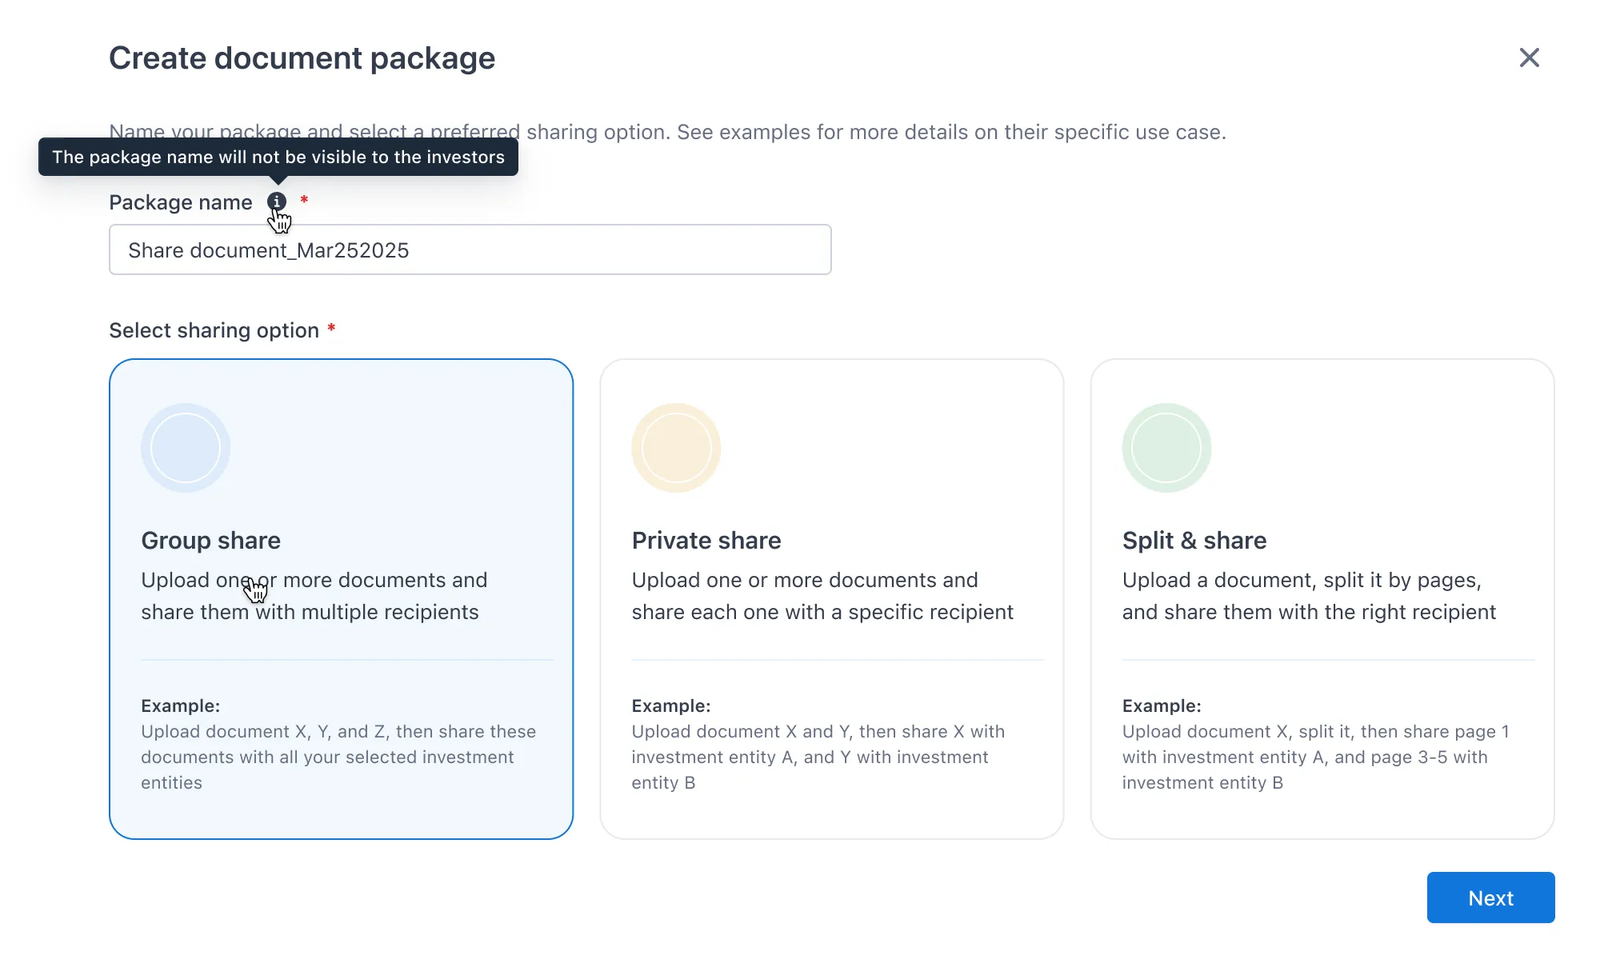
Start by naming the document package. This name is internal and used for tracking only. The system will autofill it as “Share document_(MMM-d-yyyy),” but you can rename it for easier reference.
Next, choose your sharing method. For this workflow, select “Group share”, which allows you to send the same set of files to a group of recipients. (Private share and split-share are different methods not covered in this guide.)
After you confirm and click Next, the document package will be created, and you’ll move on to the next step.
Step 2: Upload files & assign document types
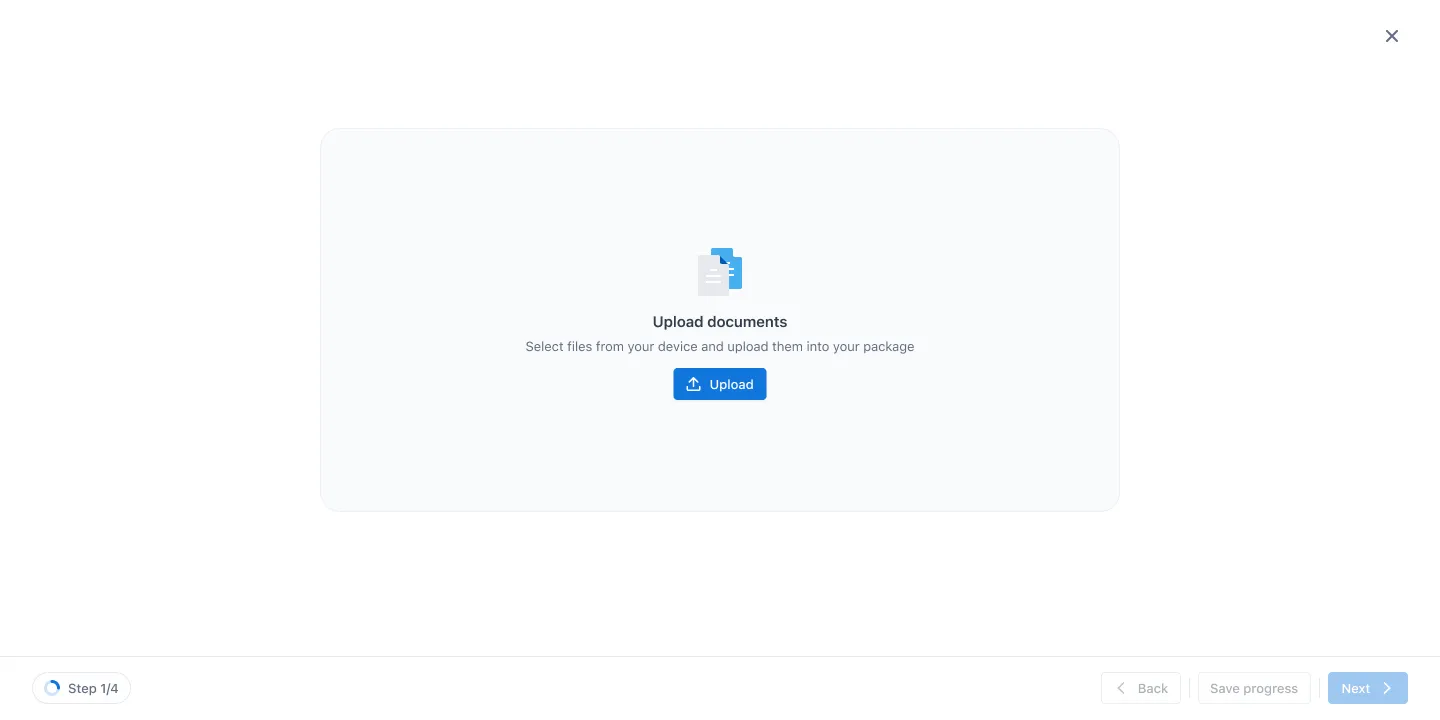
You can upload one or more files in any format, up to a total of 1GB.
In this step, you can also rename the uploaded files if you want by clicking on the Edit icon appears when hovering over each file.
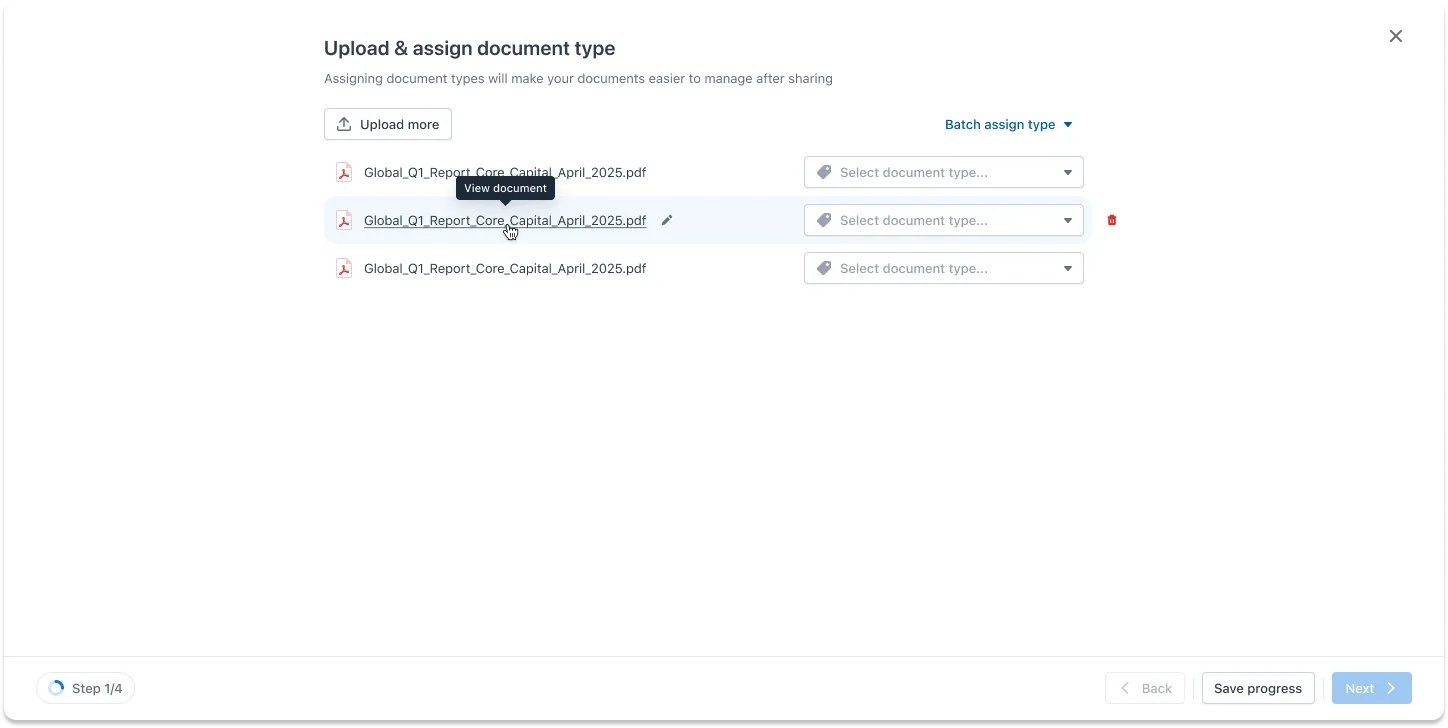
Each uploaded file needs a document type, which you can assign individually or in bulk. This document type list is configured in the Settings.
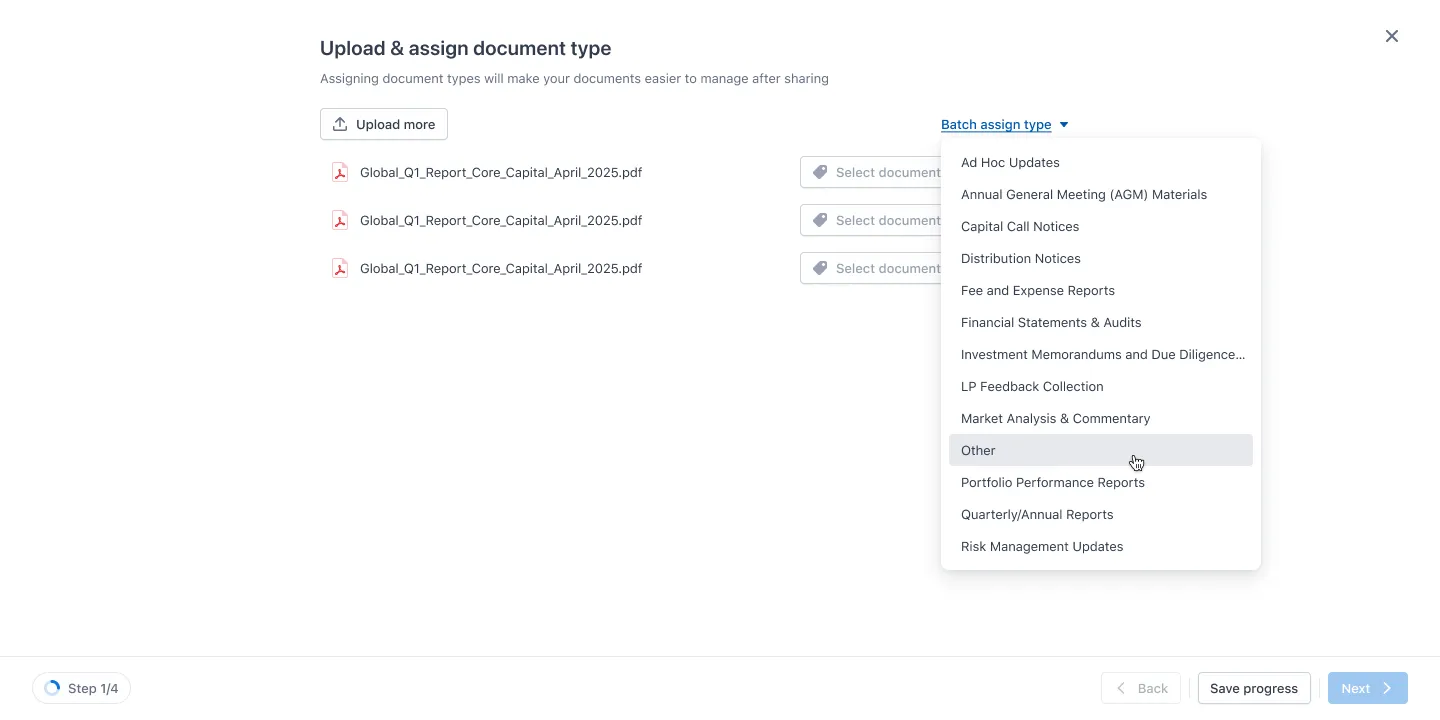
Notes:
Even if you don’t finish this step, as you have a document package created in the previous step, you can now save your progress at any time with the
Save progressbutton as shown in the bottom right corner of the screen
Once everything is all set, you can click Next to proceed.
Step 3: Choose the recipient type
In this step, you'll choose the type of recipients you want to share the documents with. There are 4 options, each supporting a different distribution need depending on your sharing intent:
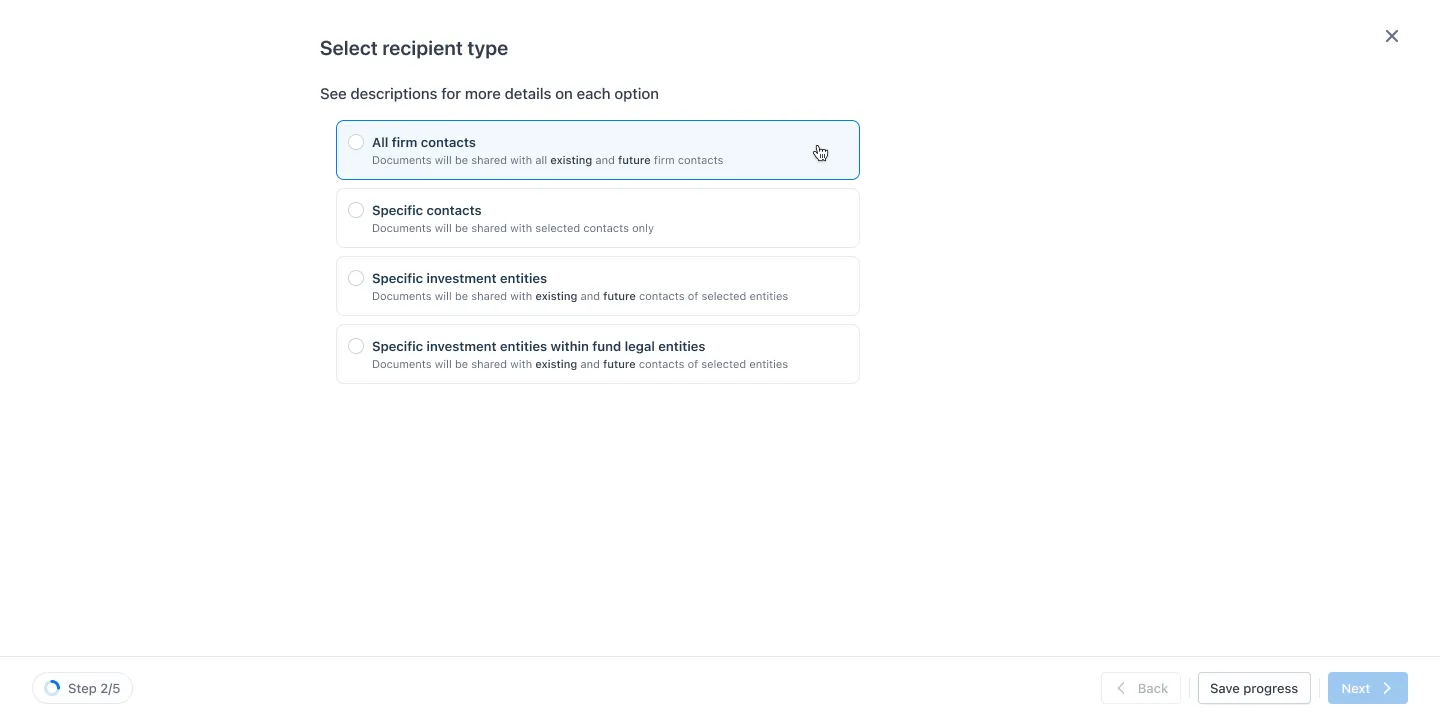
Option A: Share with All Contacts in the Firm
If you want to share the files with everyone at your firm, simply select this option.\
This is the fastest flow and will take you directly to Step 3: Prepare Message—no need to select individual recipients.
Notes: All current and future contacts in your firm will automatically receive access to the shared files.
Option B: Share with Specific Contacts
This option allows you to handpick individual contacts to receive the documents.
This flow requires you to go through an additional step, Select contacts. Here, you can search and filter through a full list of contacts within your firm. Each row provides detailed metadata to help with your selection, such as contact ID, email, associated clients or investment entities, and communication types.
You can also toggle between “All contacts” and “Selected contacts” to review your choices more easily.
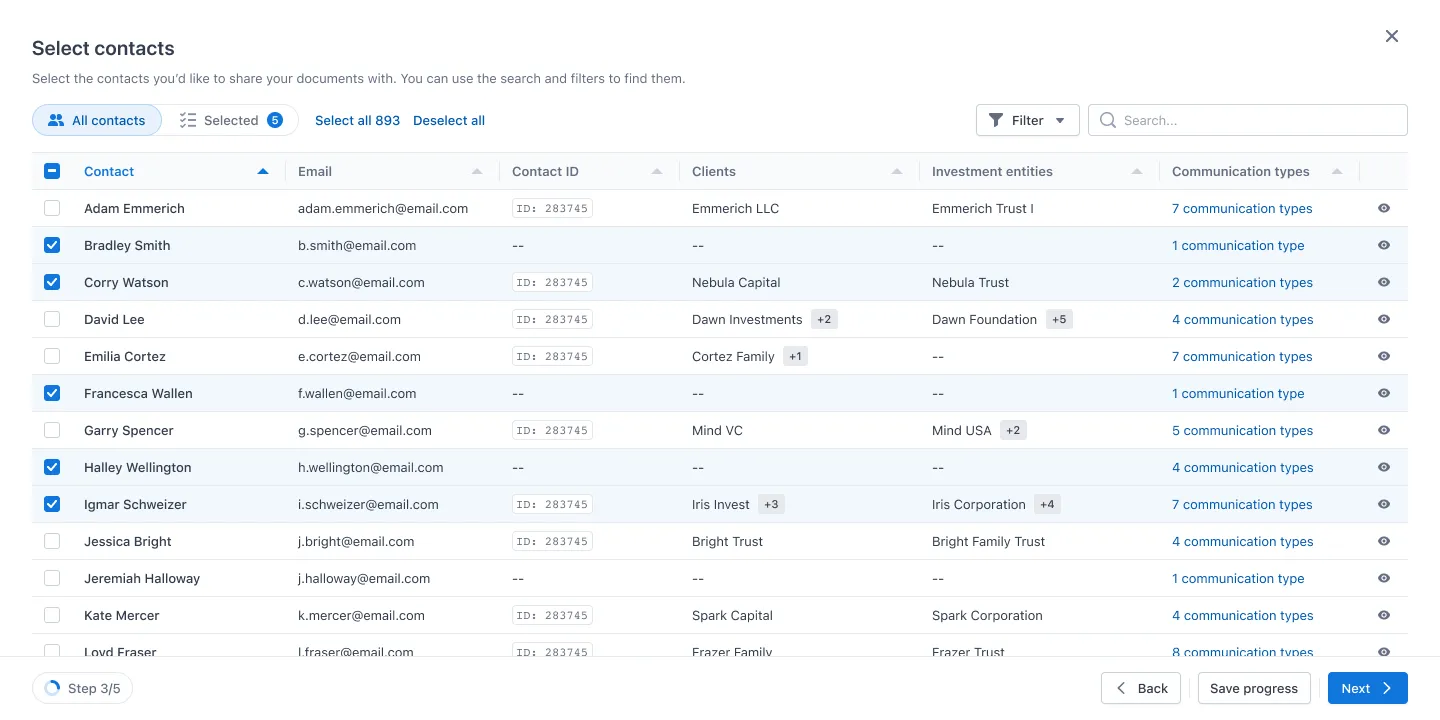
Once done, click Next to proceed to Step 3.
Option C: Share with Specific Investment Entities
Use this option when you want to share documents with all underlying contacts of specific investment entities (IEs).
With this flow, you’ll have to go through an additional Select investment entities step.
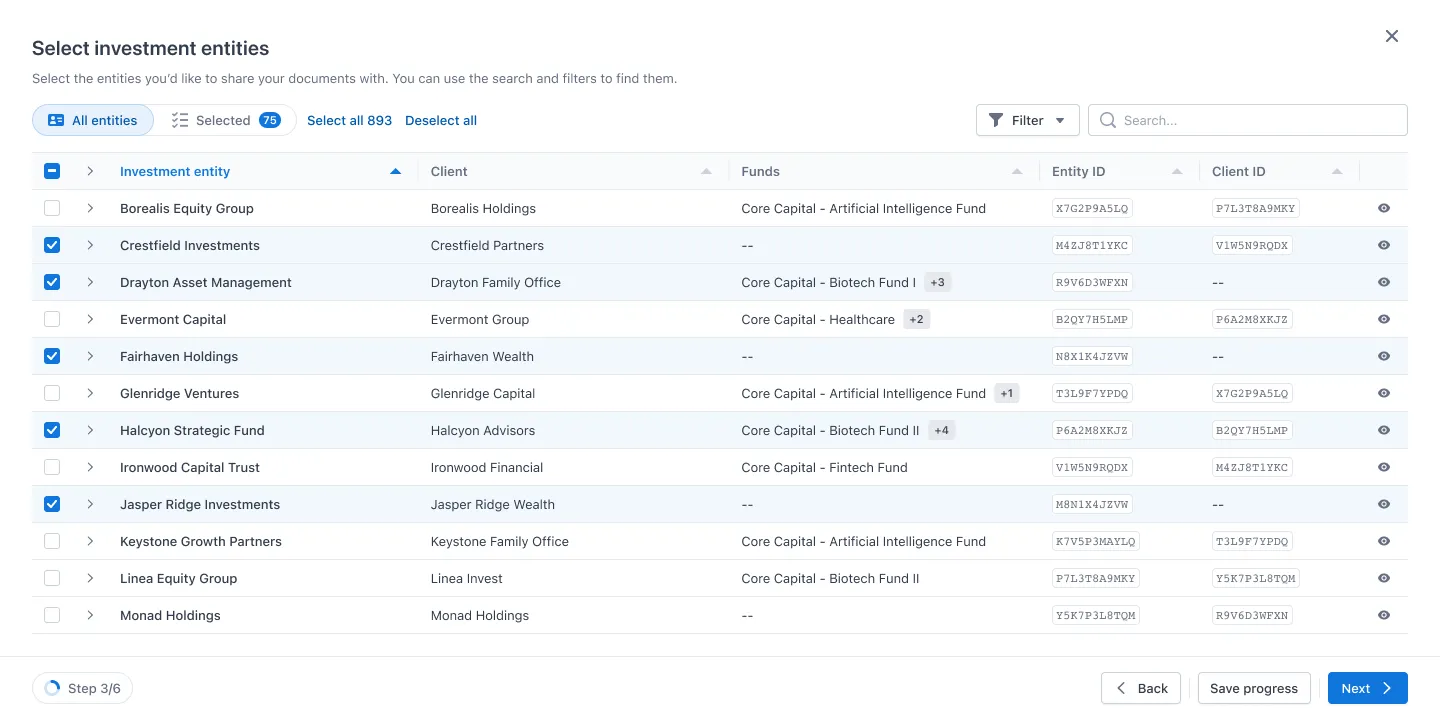
Each row can be expanded to show all contacts associated with the selected investment entity.
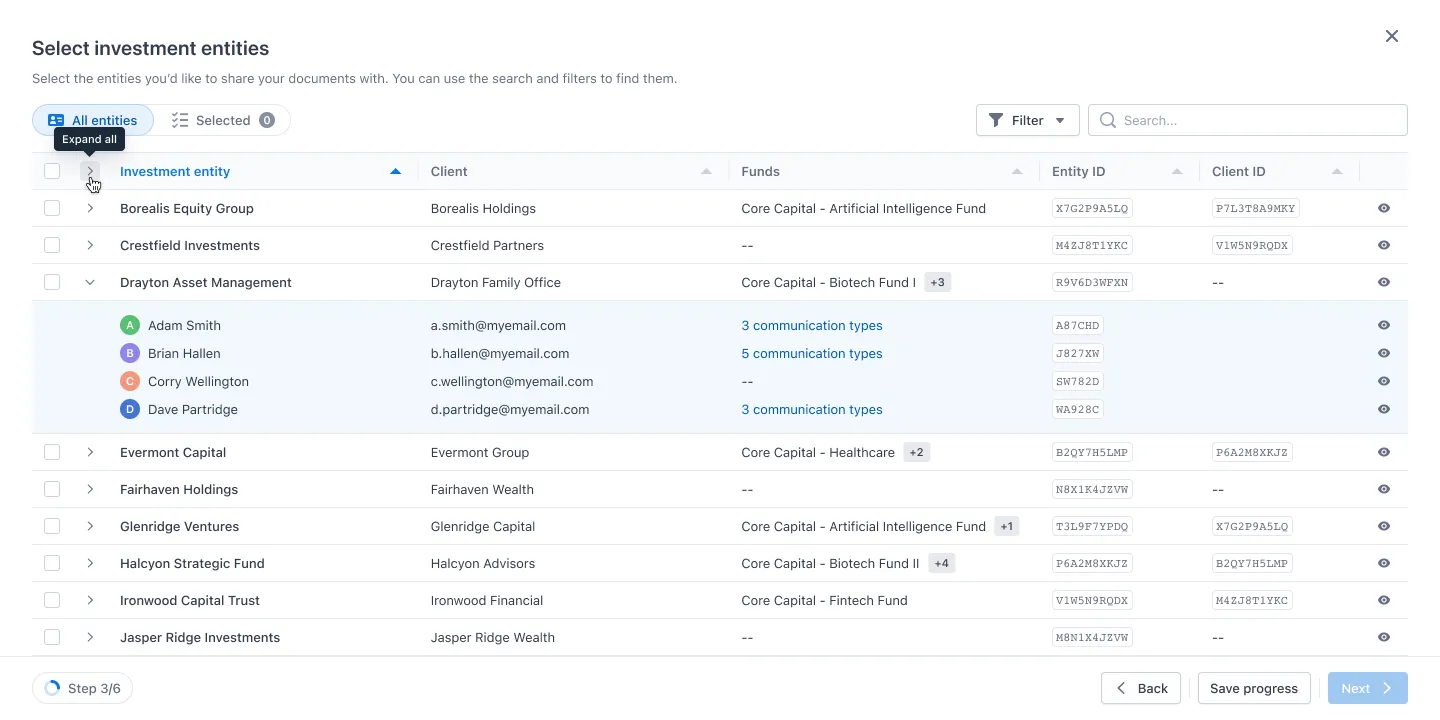
Notes: When you choose an IE, you’re giving all of its current and future contacts access to the shared documents.
Option D: Share with Investment Entities within Fund Legal Entities
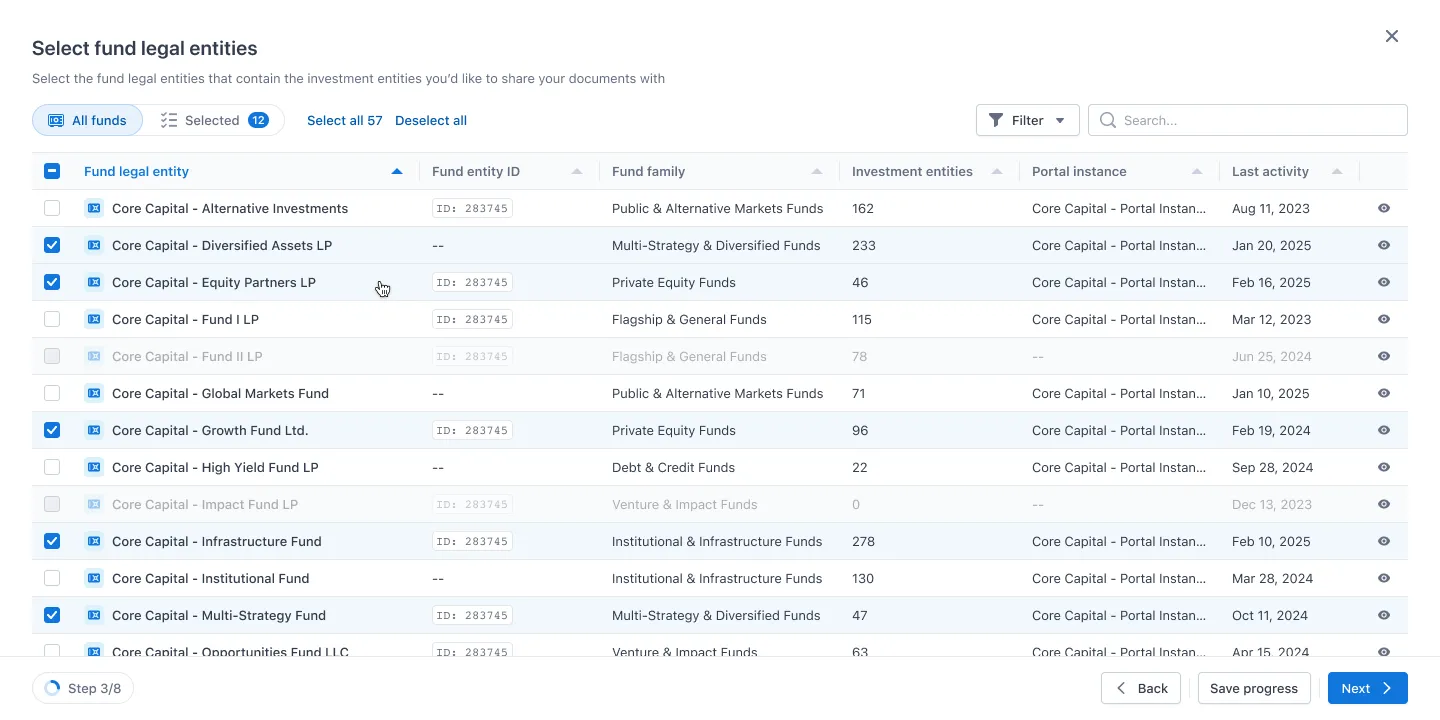
This flow is ideal when you want to share fund-specific documents, targeting investment entities under specific fund legal entities (FLEs). It’s backed by the contact matrix, ensuring documents are shared securely and only with the right contacts.
In this flow, there will be 3 additional steps for you to go through.
1. Select Fund Legal Entities (FLEs): You’ll start by choosing one or more fund legal entities (FLEs). Like other flows, there’s a toggle to switch between viewing all FLEs or just your selected ones.
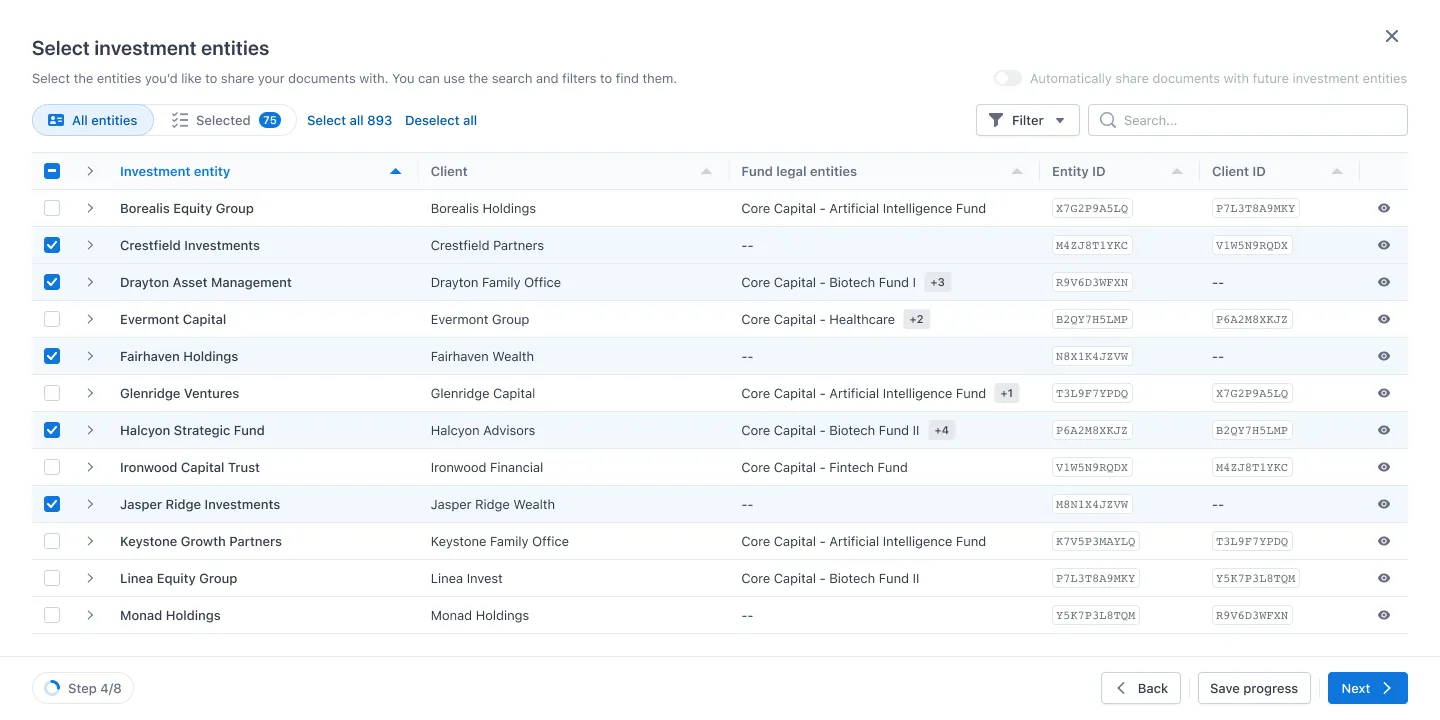
- Select Investment Entities: After selecting funds, you'll move to a list of investment entities under those FLEs. You can expand each IE to view associated contacts.
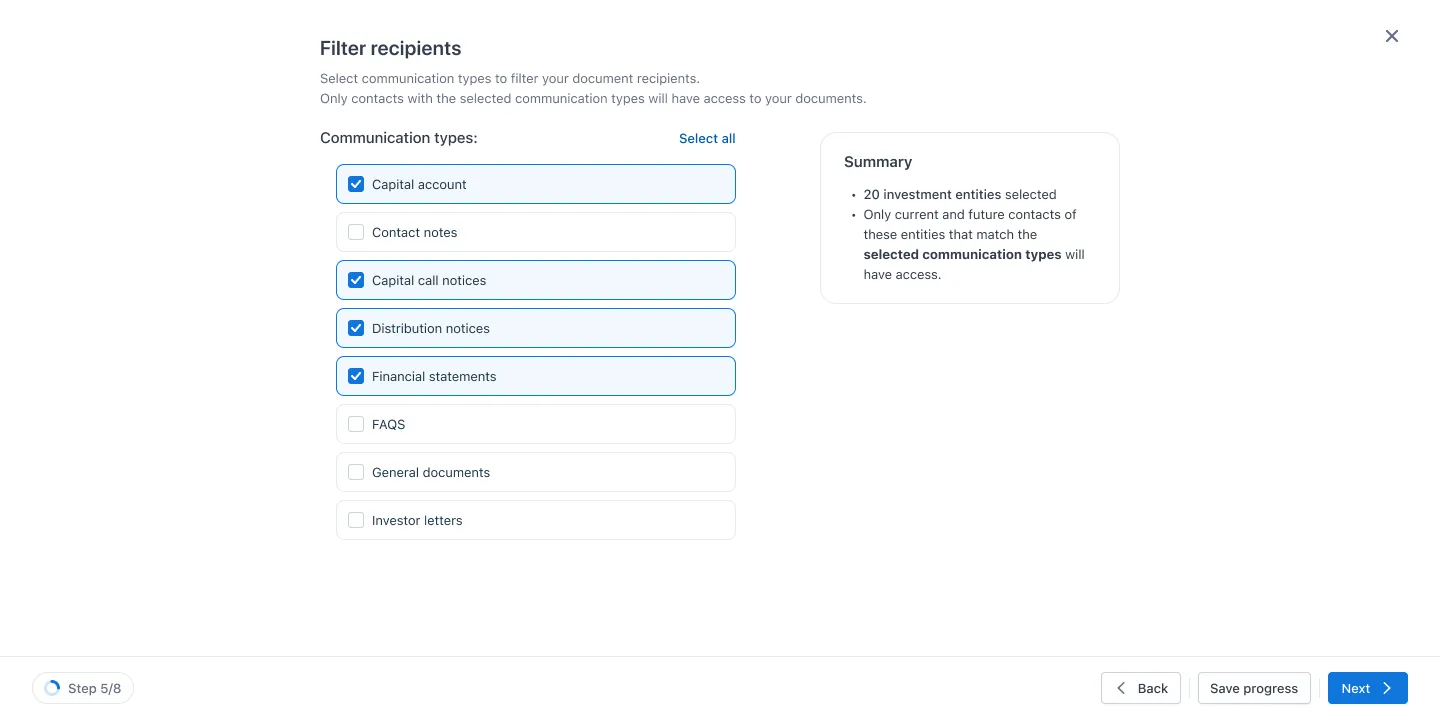
3. Filter recipients by Communication Types: Next, you can refine which contacts will receive access using communication types. This ensures only contacts tied to the selected FLEs, IEs, and comm types are included in the share.
Step 4: Prepare message
Here, you’ll craft the email that goes out with your document share. You will need to fill in the Subject, Message, and the Call-to-action to proceed
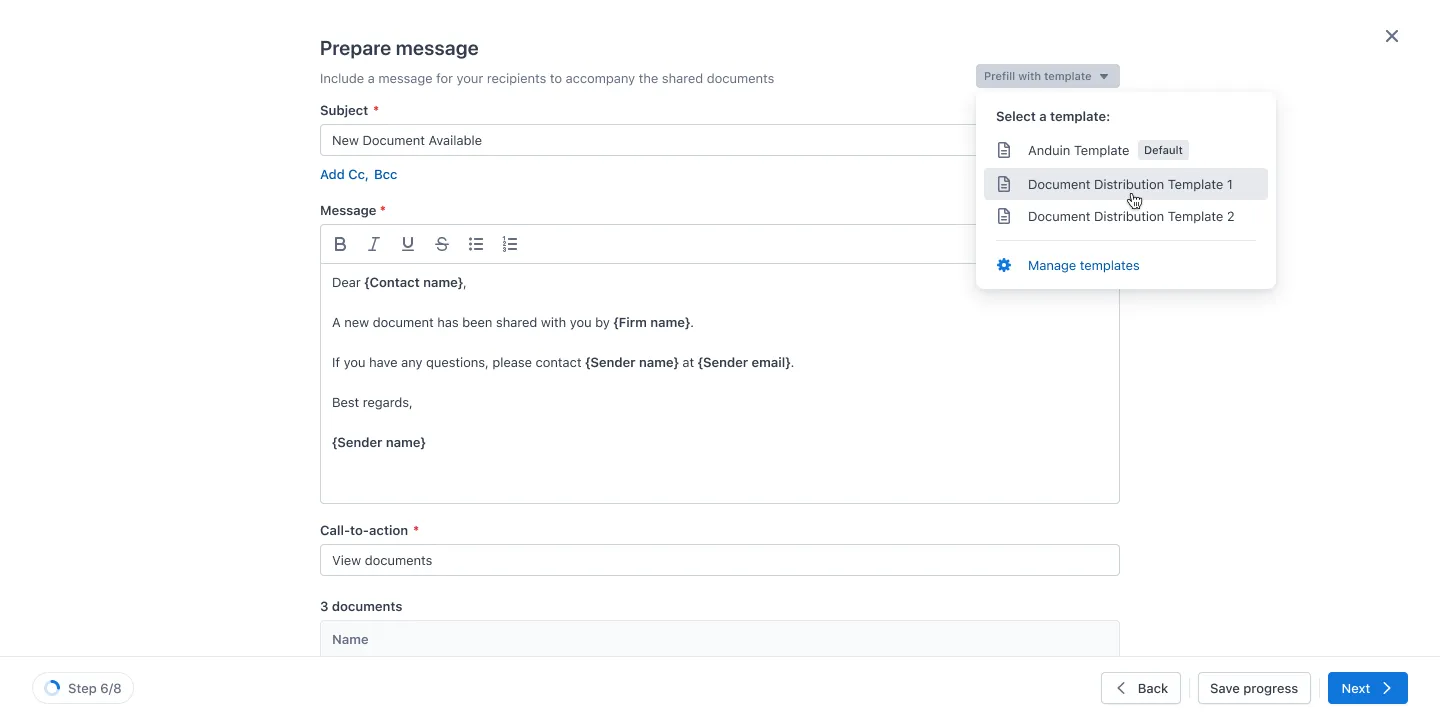
However, by default, the Anduin email template for document distribution is used for prefill, but you can choose a different one if needed. A full list of the files you’re sharing will be shown at the bottom of this step so you can double-check if necessary.
Step 5: Review contacts
If you share your documents with “Option C: “Specific investment entities” or Option D: “Specific investment entities within fund legal entities”, you will go through this additional step
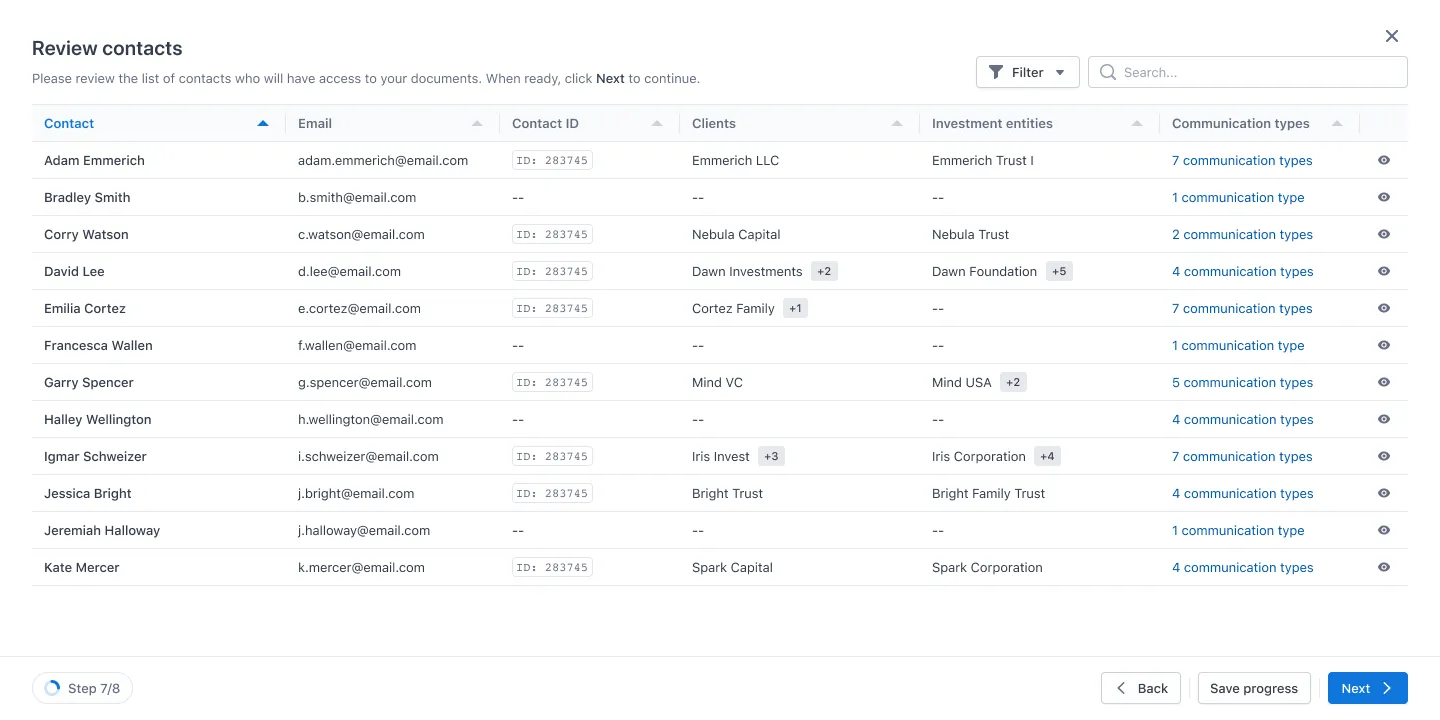
This shows a flat list of every contact who will receive access, along with details like name, email, contact ID, client name, and the IE they’re linked to. You can also click “View communication type” to understand how each contact is tied to the documents through your selections.
Step 6: Sharing settings
Before sending, you can adjust how and when the documents are delivered.
- By default, files will be shared immediately, but you can schedule them to go out later if needed.
- Notifications can also be sent immediately or turned off completely.
- You can also choose whether recipients can download the files.
– If downloads are allowed, you’ll have the option to attach the documents directly in the notification email.
- There’s also a watermarking option to make your documents even more secure. By default, it uses your firm name, but you can change the text, pick a color, set transparency, and adjust the layout if needed
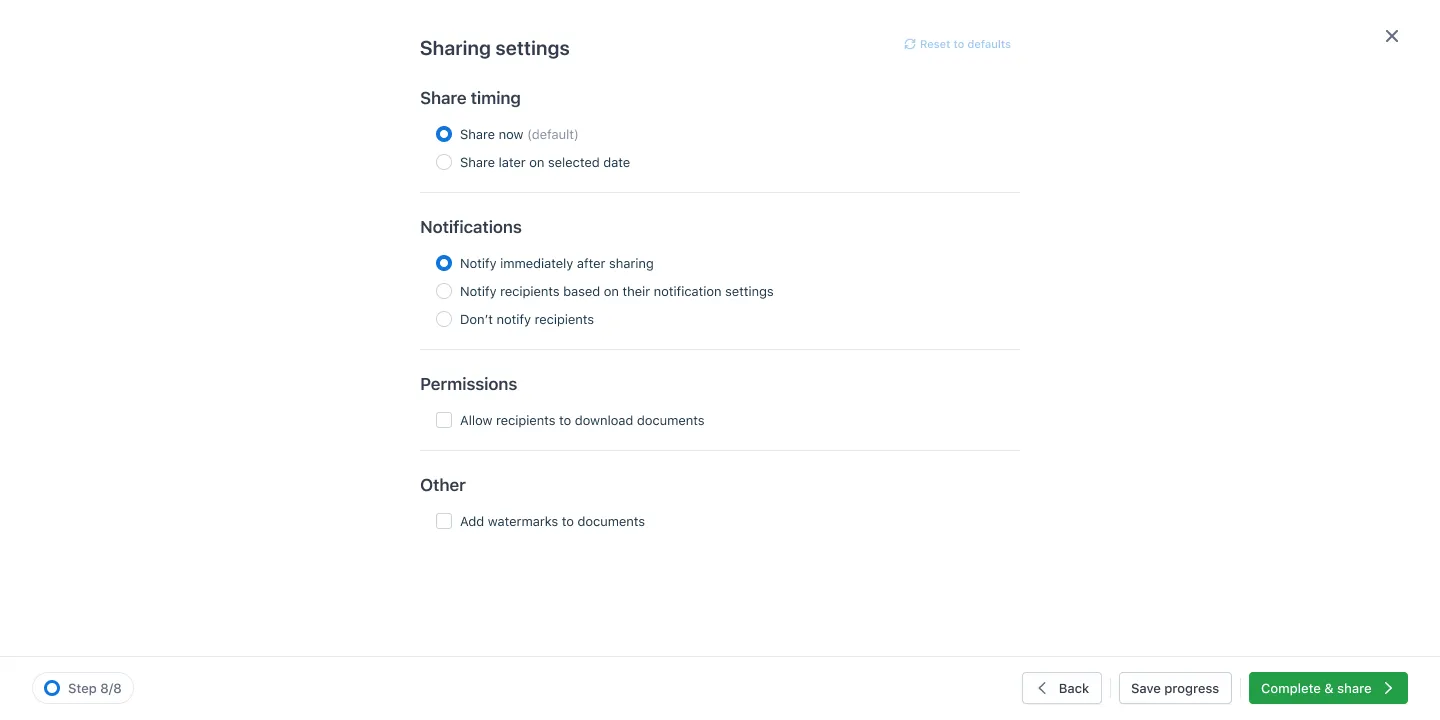
Once everything looks good, hit Complete & share to send out the documents to your selected recipients. That’s it!