

How to use Tags in Dataroom?
Who this is for: Data room admins who manage a participant list and want to label and segment participants beyond groups. What you'll do: Create tags, assi
Who this is for: Data room admins who manage a participant list and want to label and segment participants beyond groups.
What you'll do: Create tags, assign them to participants, manage tag names and colors, and use tags to filter, export, and read Insights.
How long: A minute or two to create and assign your first tags; the column, filters, and Insights views update in real time as you go.
When to use this
Use tags when you want to label participants by a dimension that groups don't capture:
- Mark participants by region, investor type, or deal stage without changing their permission group
- Segment a large participant list so you can filter to just the participants you care about
- Carry that segmentation into exports, Insights, and upload notifications
Tags are labels, not permissions. If you need to control who can see which documents, use groups and permission levels instead—tags never change access.
Before you start
A few things to know up front:
- You need the admin role in the data room. Only admins can create, assign, rename, recolor, or delete tags. Non-admins never see the tag controls.
- Tags live at the data room level. Once created, a tag is available to assign to any participant in that data room.
How to tag participants
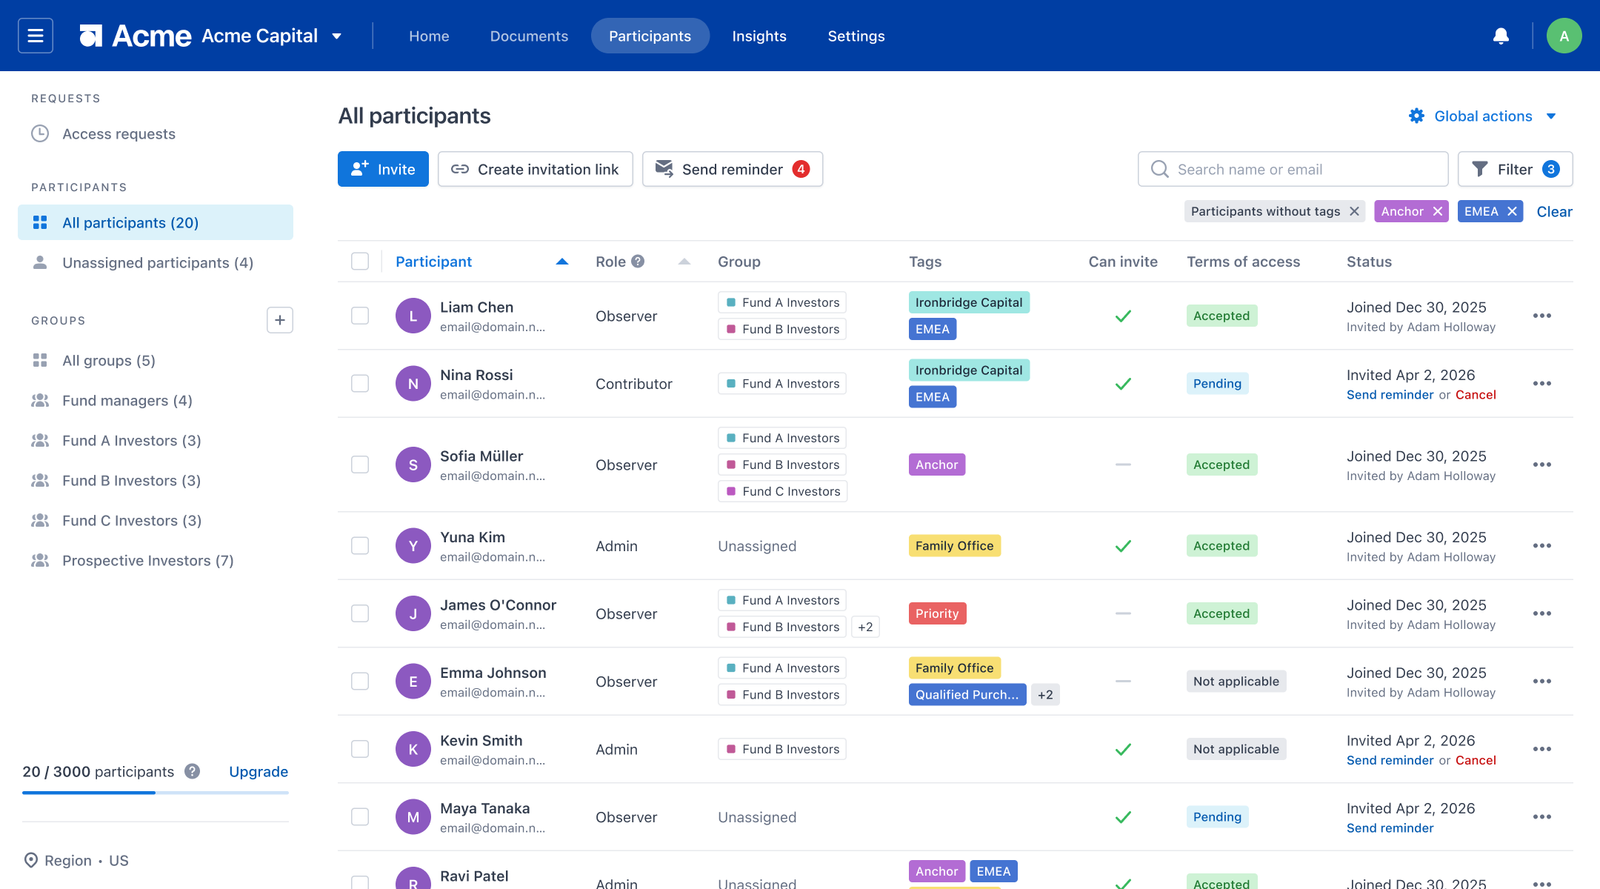
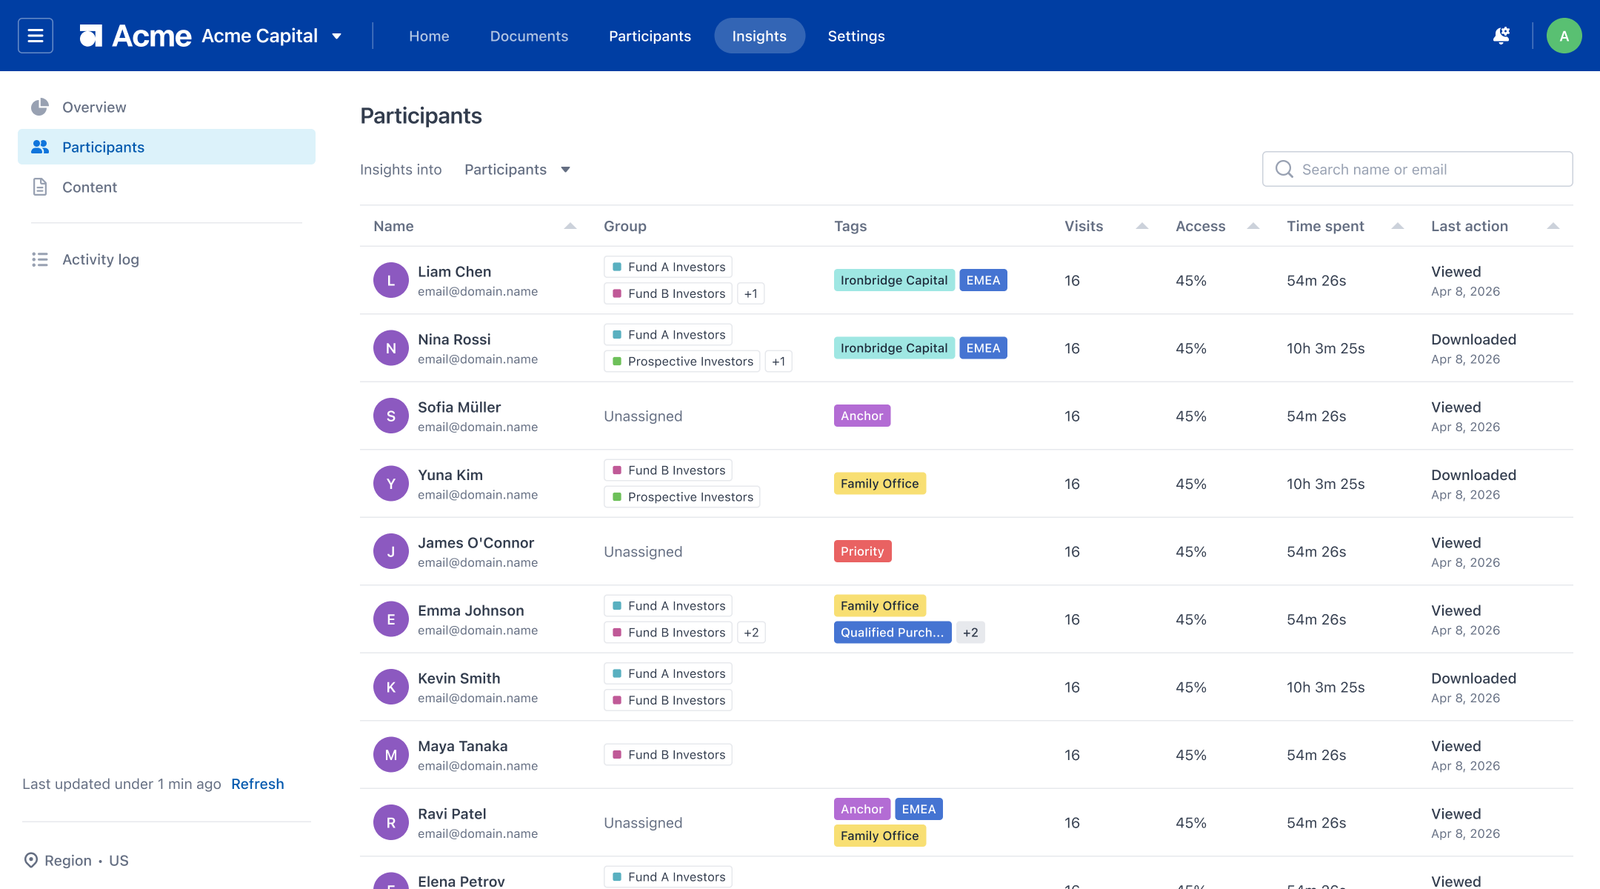
Tags appear in their own column in the participant table, right after the Group column, across all three participant views: All participants, unassigned participants, and the group detail view. The column is always visible, even before any tags are assigned.
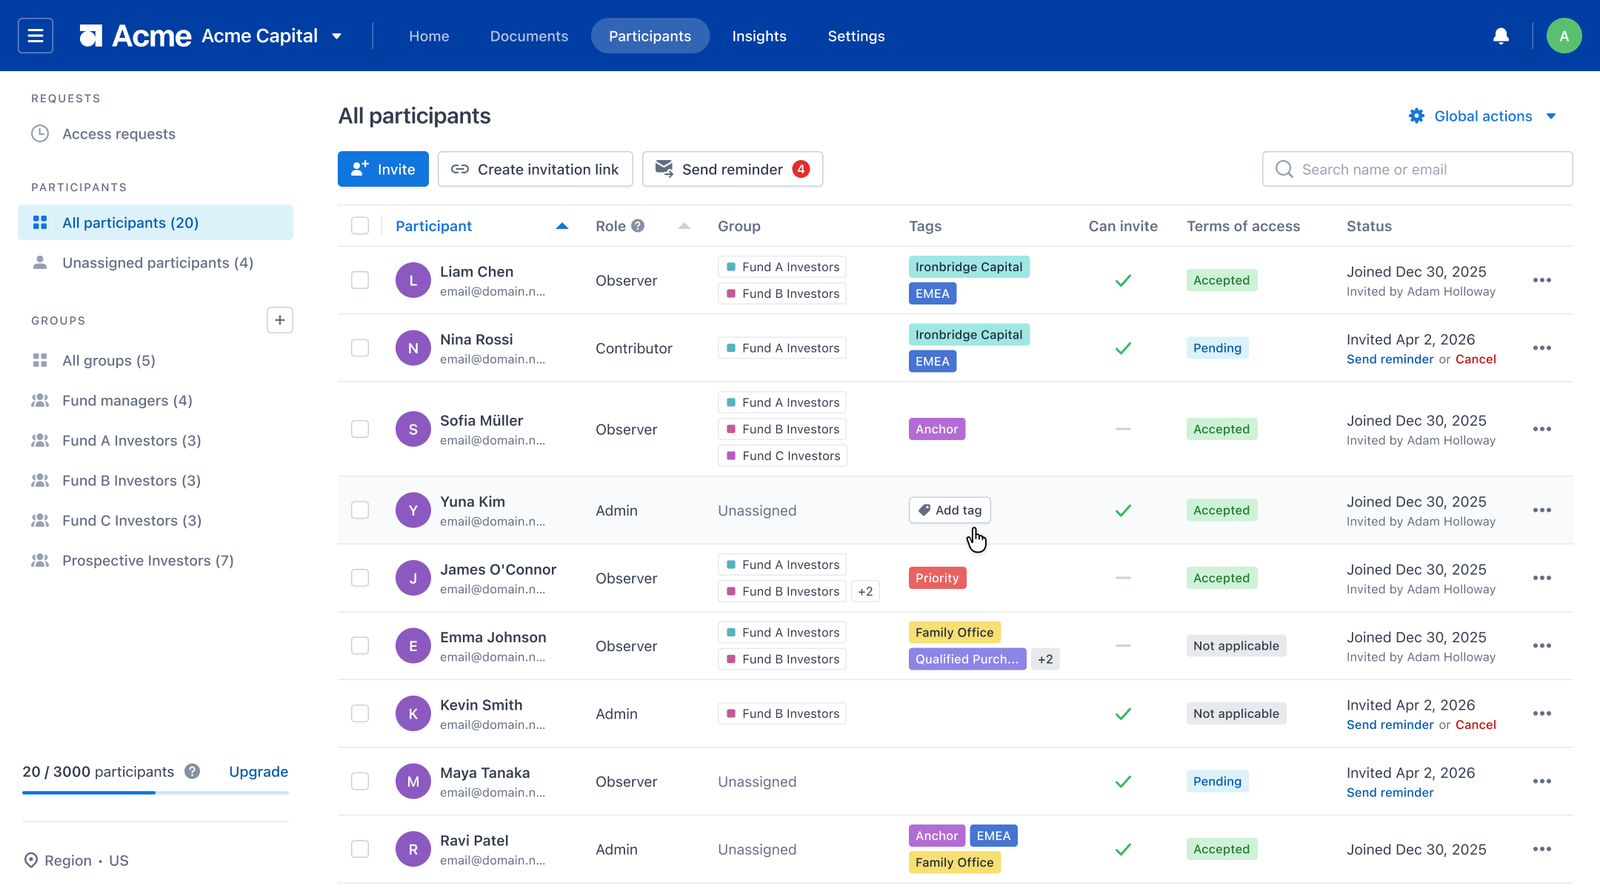
Step 1 — Open the tag popover on a participant
- Hover over the participant's row.
- In the Tags cell, click Add tag (the tag icon button that appears on hover).
The tag popover opens with a search bar, a scrollable list of existing tags, and a Manage Tags option pinned at the bottom.
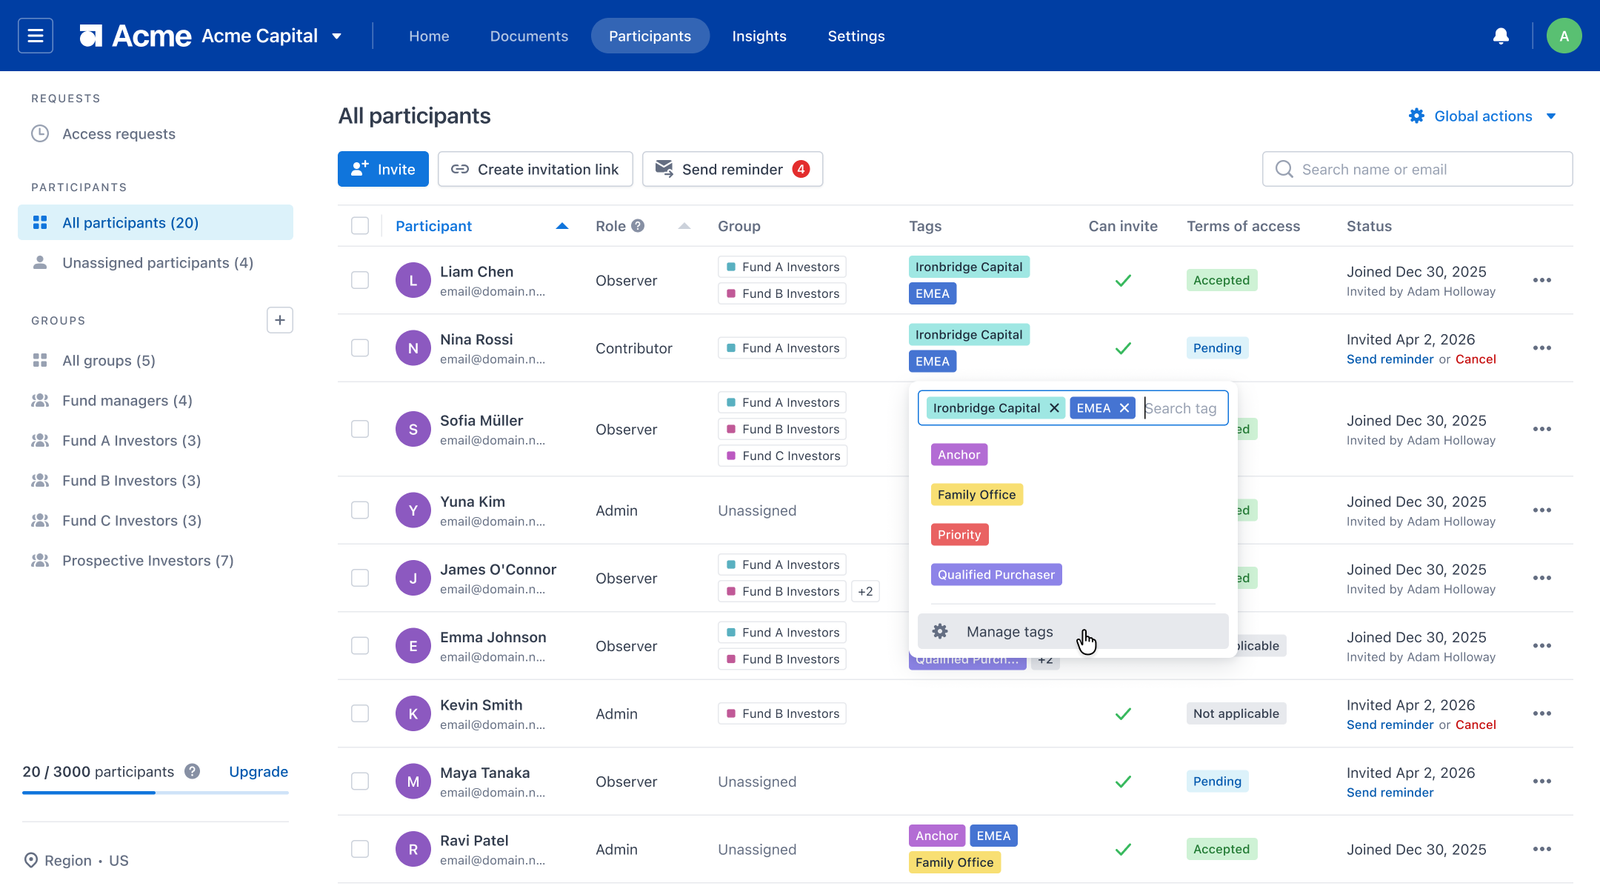
💡 Pro tip: If the participant already has tags, hover the row and click the small edit (✎) icon in the cell instead — the same popover opens with their current tags shown in the search bar.
Step 2 — Assign an existing tag
- In the popover, scroll or start typing in the search bar to filter the list.
- Click any tag to assign it. The chip appears in the cell immediately.
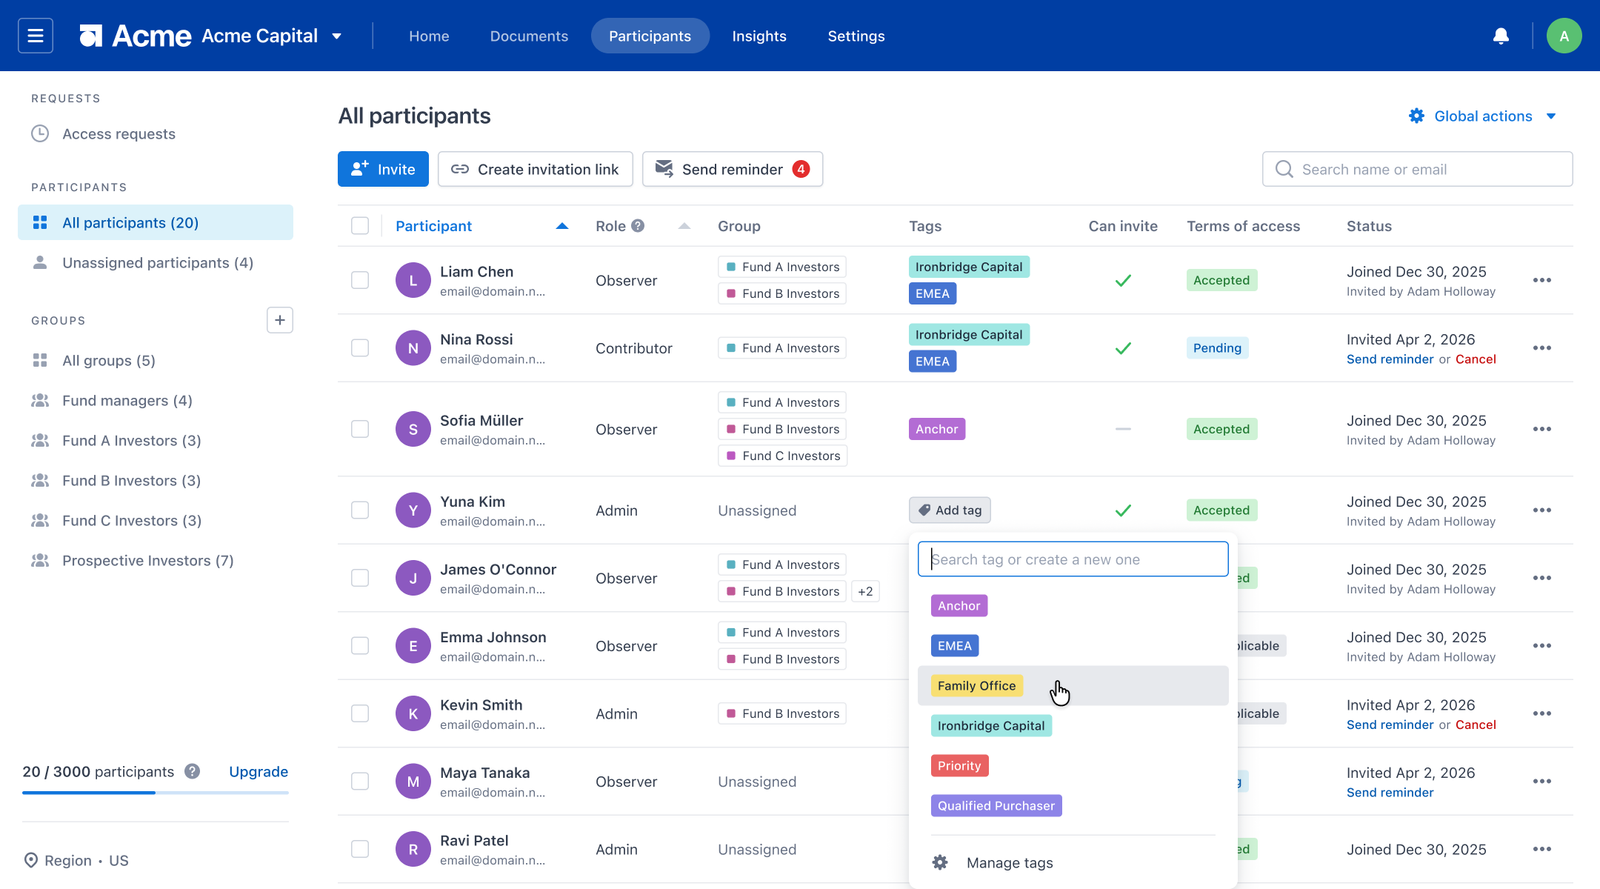
Step 3 — Create a new tag on the fly
- Type the new tag name in the search bar.
- If no existing tag matches, a Create (name) row appears at the bottom of the list. Click it.
Step 4 — Remove a tag from a participant
- Hover the participant's row and click the edit (✎) icon in the Tags cell to open the popover.
- Each assigned tag shows as a chip in the search bar with a remove (×) button. Click the × on any chip to unassign that tag.
You can remove every tag until the participant has none. An untagged cell goes empty, and the “Add tag” affordance returns on hover.
Manage all your tags
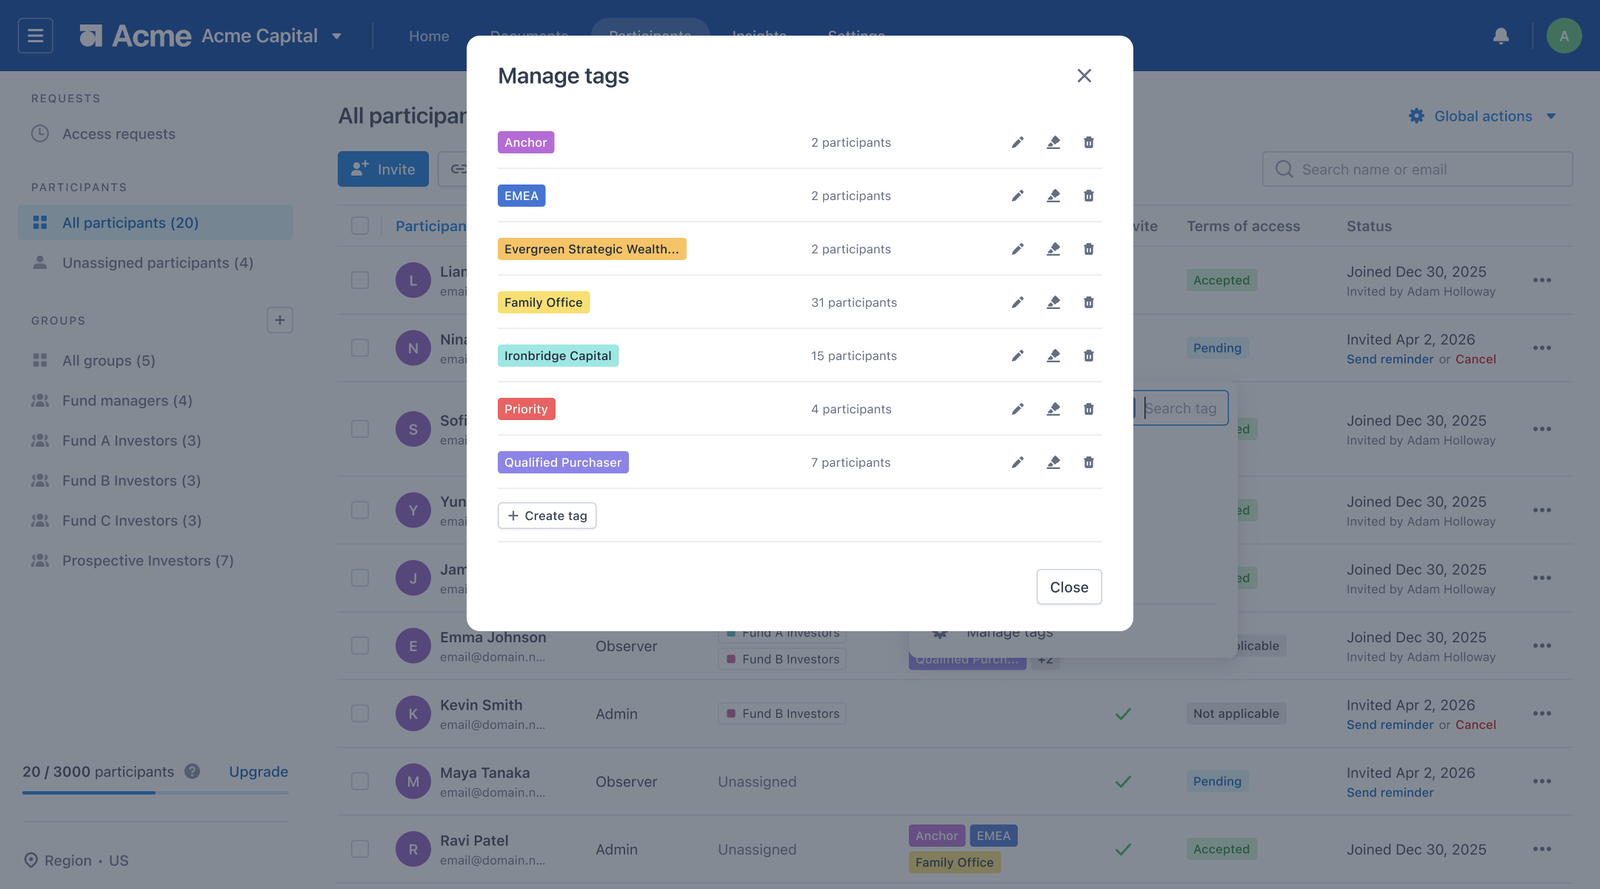
Each tag row shows the tag chip, the number of participants who carry it, and three icon buttons: Rename, Set color, and Delete. The list is always sorted alphabetically, and a Create tag button sits at the bottom.
- Rename — click the rename icon to edit the name inline. “Confirm” is disabled if you clear the field.
- Set color—click the color icon to open a 16-color dropdown. The dropdown stays open so you can try different colors; click outside to dismiss.
- Delete — click the delete icon. You'll be asked to confirm. On confirmation, the tag is removed from the list and from every participant who had it
- Create tag — click the button to reveal an inline name field. Confirm is disabled until you type at least one character.
If the data room has no tags yet, the modal shows a No tags yet empty state with a button to create your first tag.
What happens after you tag a participant
Tagging takes effect immediately and everywhere a chip can render.
- The chip appears in the participant's Tags cell, sorted alphabetically with any other tags on that participant.
- The same tag shows up wherever that participant is listed—Insights tables, modal headers, and notification recipient lists.
- When a participant's cell holds more chips than fit, it renders the first 2 chips plus a +N indicator. Hover the indicator to see all tag names.
There's no processing delay and nothing to confirm. If you created a new tag, it's now part of the data room's tag set and available to assign to anyone else.
Filter participants by tag
The Filter button sits at the top right, next to the search bar, in every participant list view. It's hidden entirely when no tags exist in the data room.
Step 1—Open the filter and choose tags
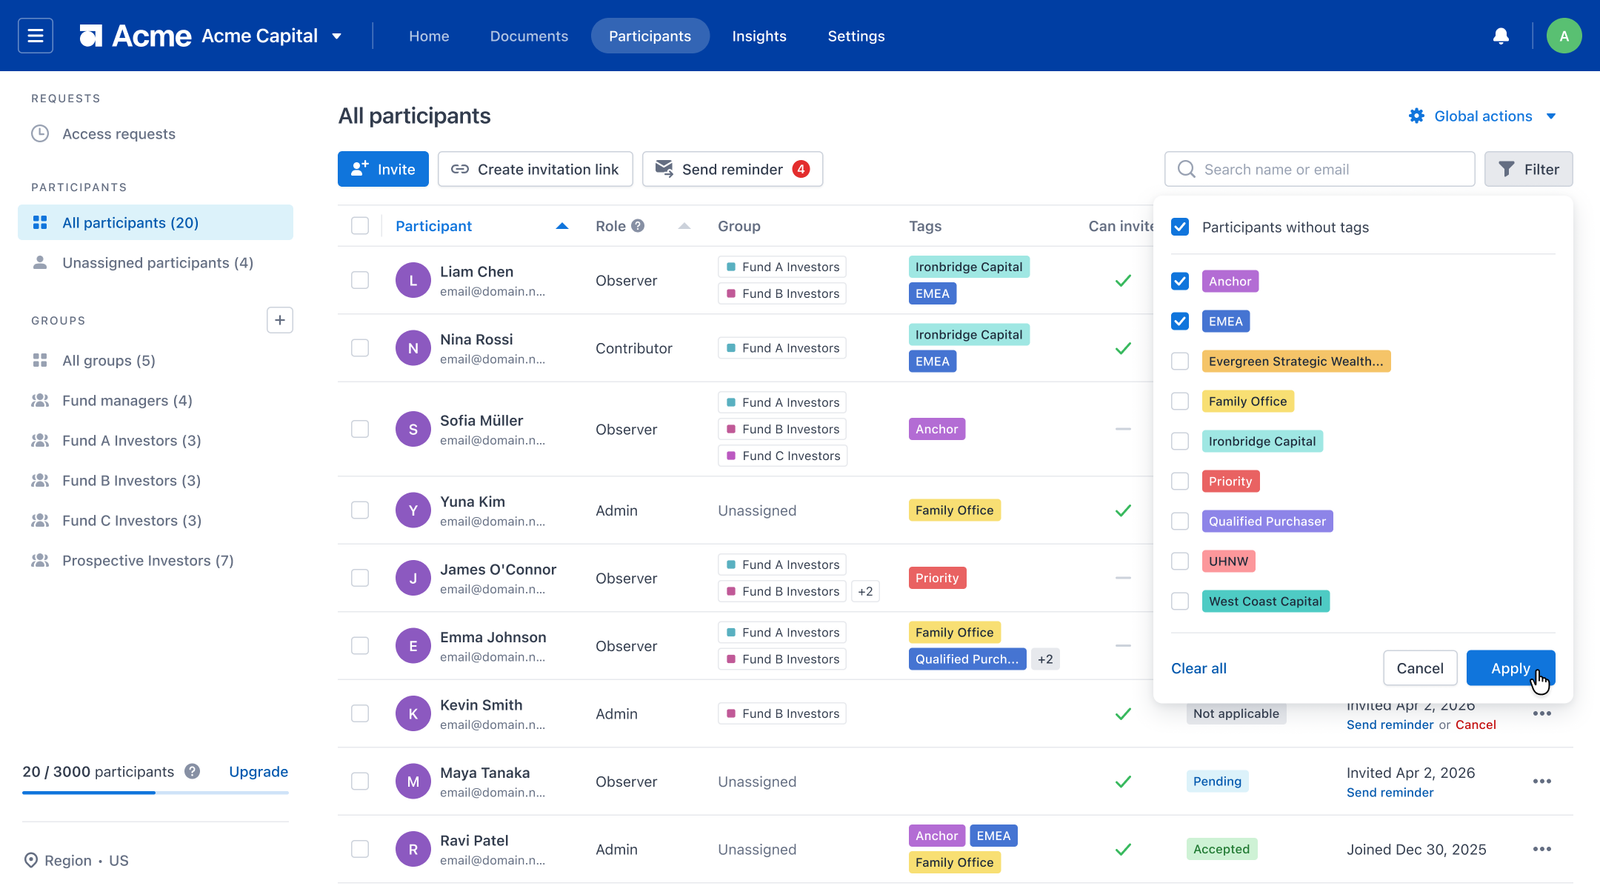
- Click Filter.
- The dropdown lists all tags alphabetically. At the top, above a divider, is a Participants without tags option for finding participants with no tags assigned.
- Check any tags you want. The list uses OR logic — it shows participants carrying any of the selected tags.
💡 Pro tip: Hover any row and click Only this to select that tag exclusively and clear everything else in one move.
Step 2 — Adjust or clear the filter
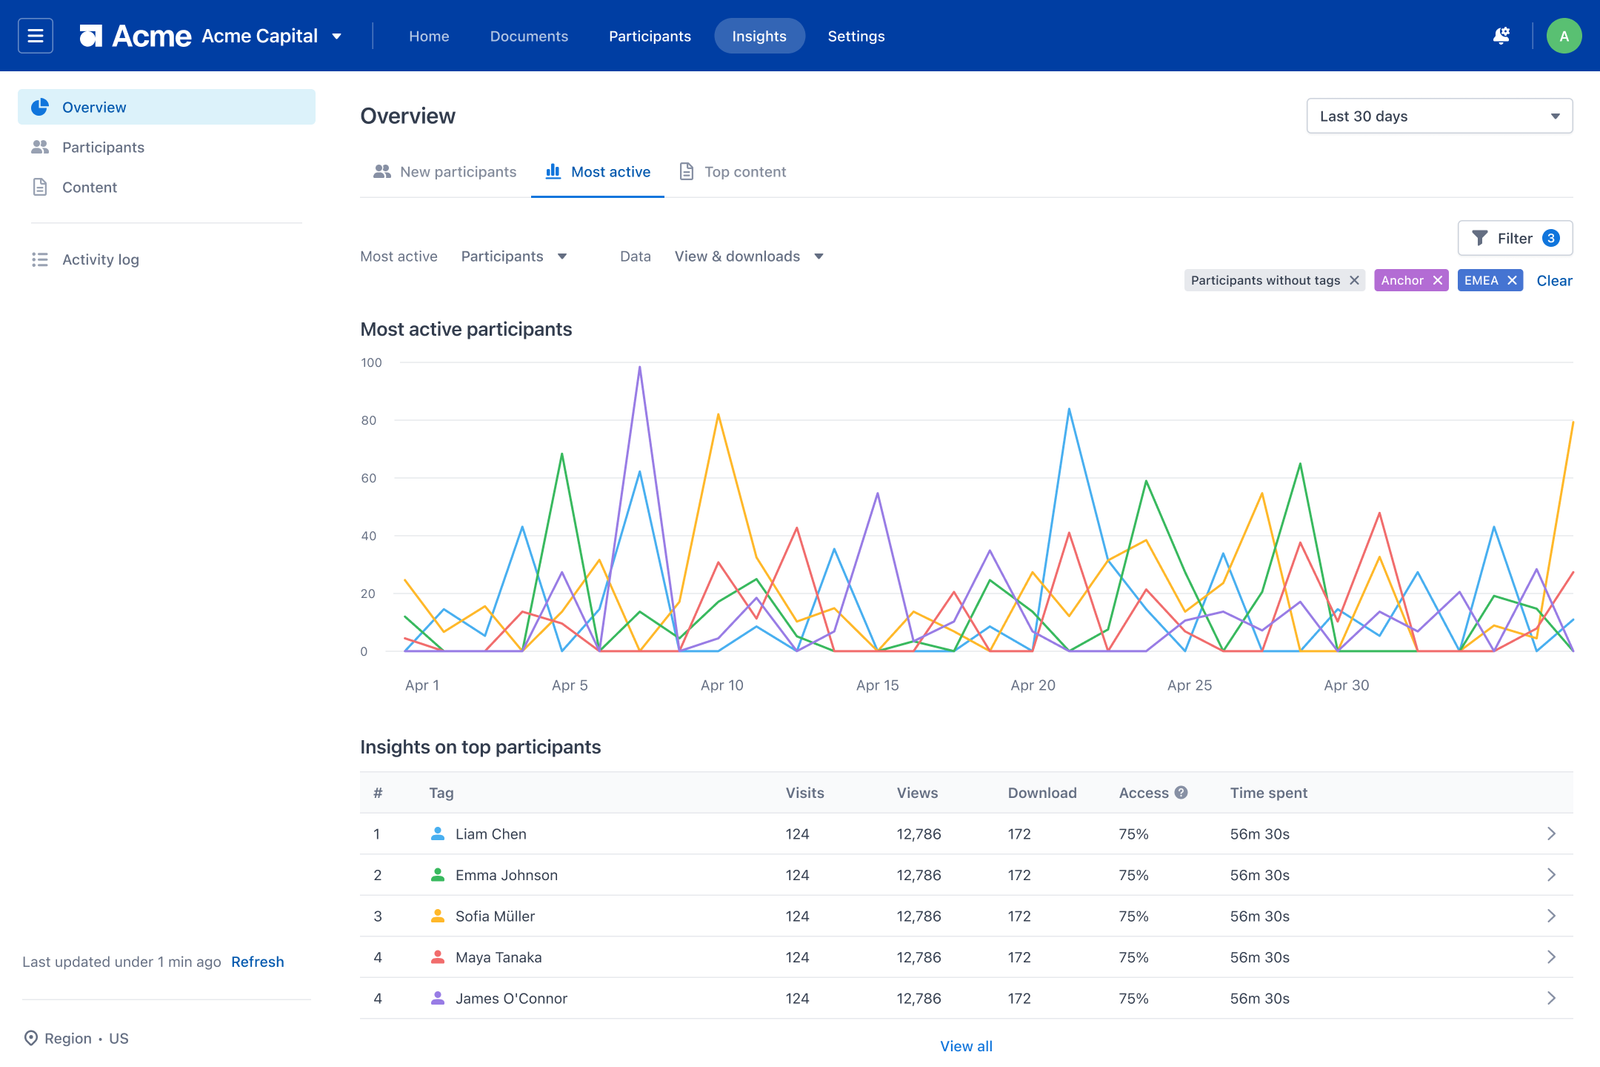
- Active selections appear as chips below the search and filter bar. The Filter button shows a badge with the count of active selections.
- Click the × on any chip to drop that one tag, or click Clear at the end of the chip row to remove all filters at once.
When 4 or more filters are active, the chip row shows 2 chips plus a +N more indicator.
In the Group detail view, the filter only lists tags that actually exist on that group's members — data room tags not present in the group are hidden from the filter there.
Tags in exports
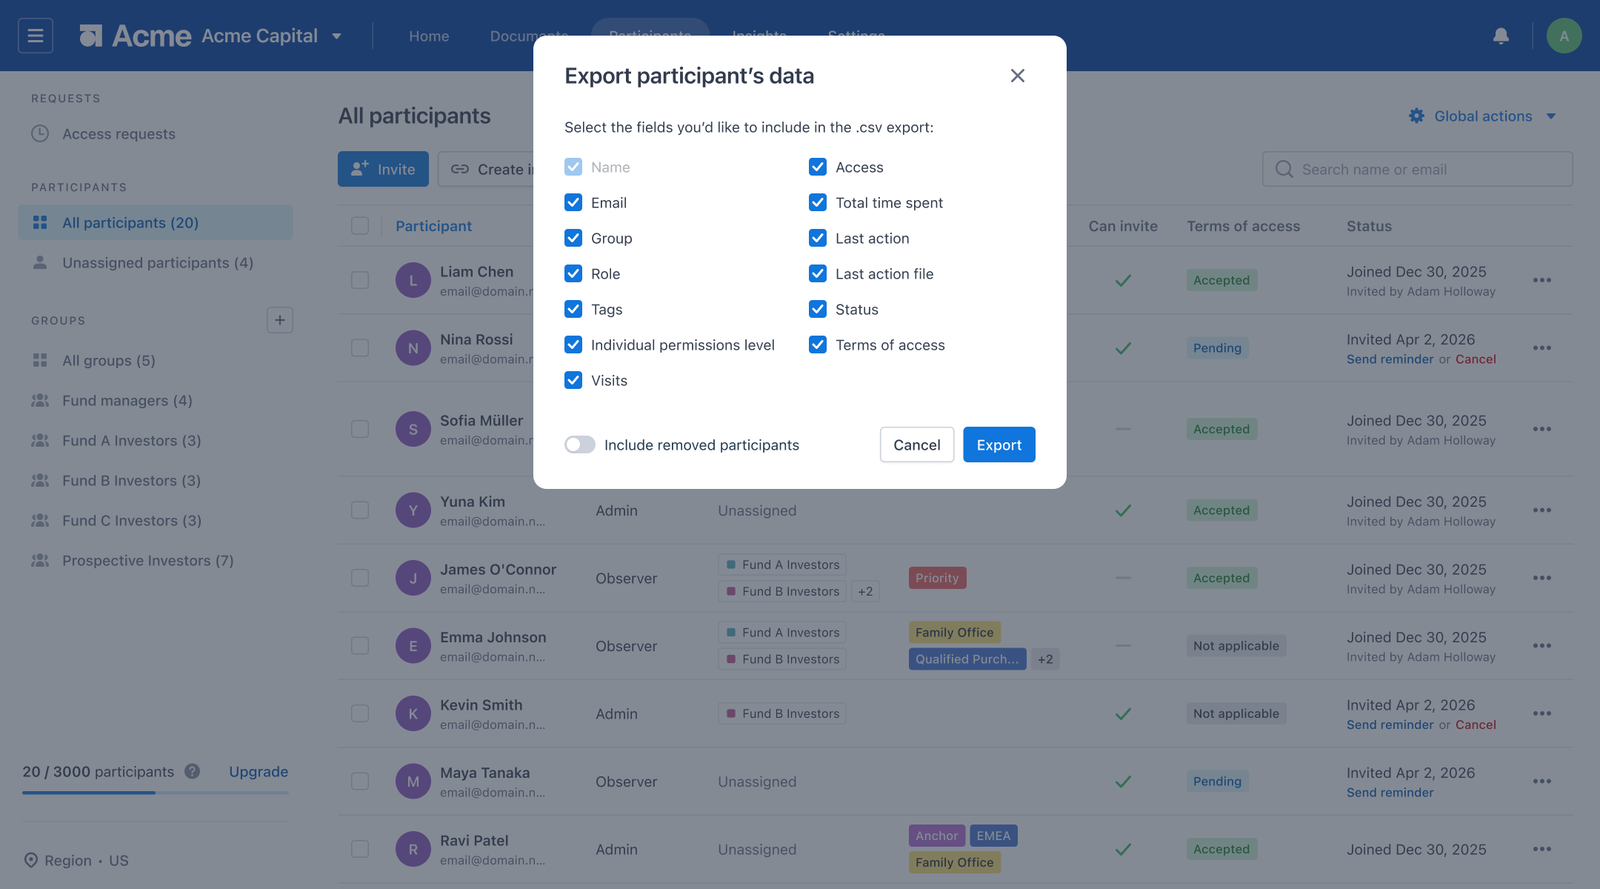
When you export participant data, you can include tags.
- Open the participant data export panel.
- In the left column, between Role and Individual permissions level, check the Tags box.
- Run the export.
The exported .csv includes a Tags column with each participant's tag names, comma-separated.
Tags in Insights
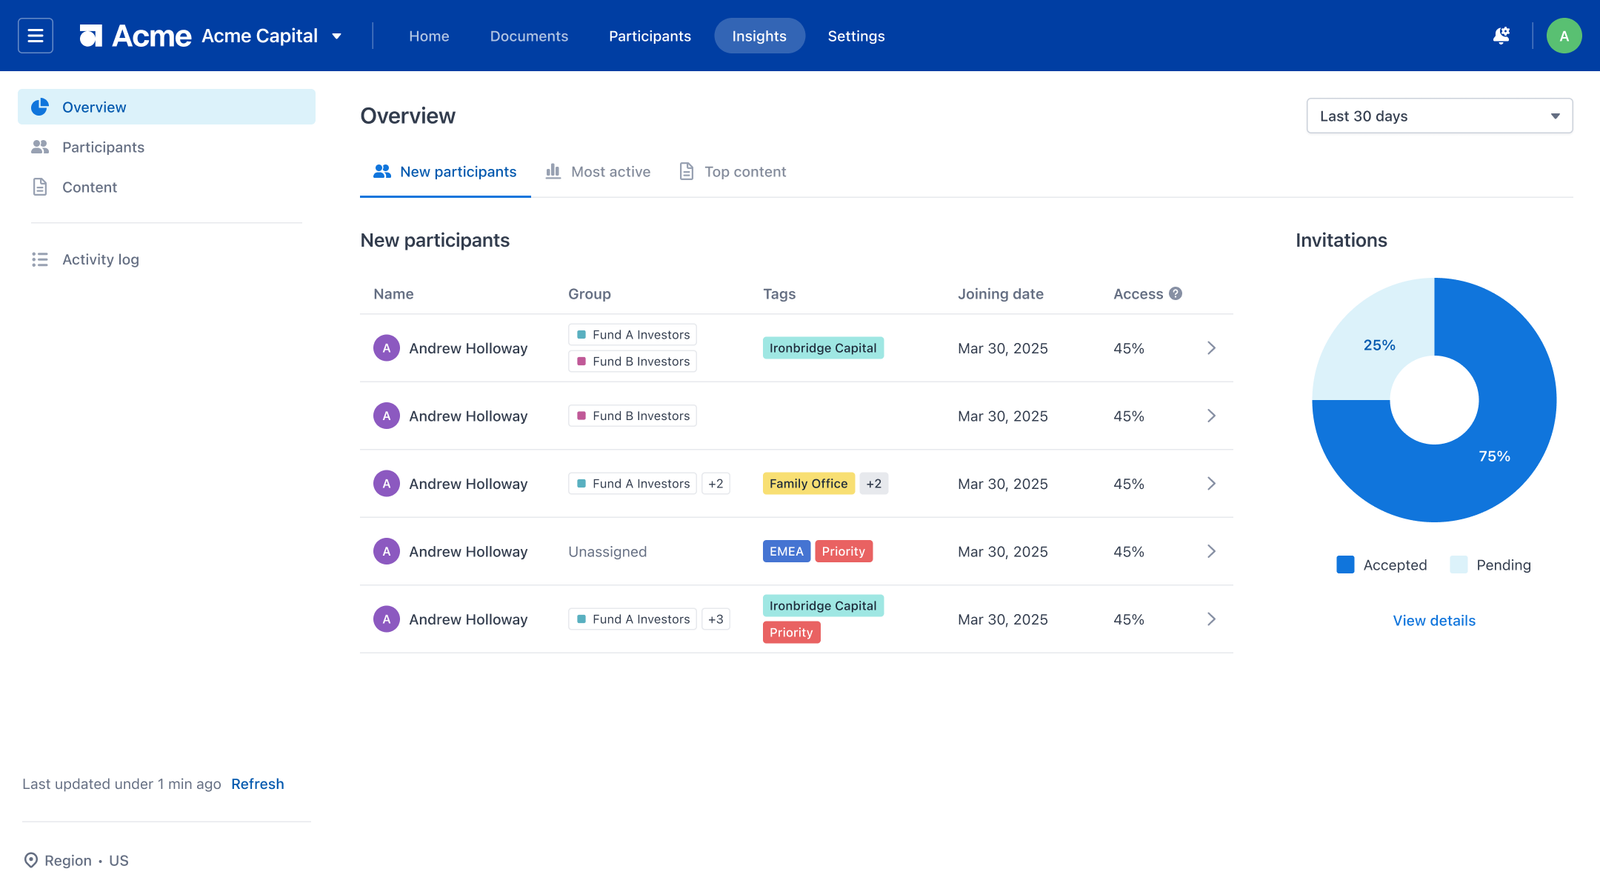
Tags add a new segmentation dimension across Insights. The Tags option is greyed out and disabled anywhere it would appear until at least one tag exists in the data room.
In the Overview tab
- The New Participants table gains a Tags column after the Group column.
- The most active dropdown gains tags as a third option alongside Participants and Groups. Selecting it shows a line chart of the top 5 tags by your chosen metric (Views & Downloads, Access %, or Time Spent), with each line colored by the tag's assigned color, and an Insights on Top Tags table below.
In the Participants tab
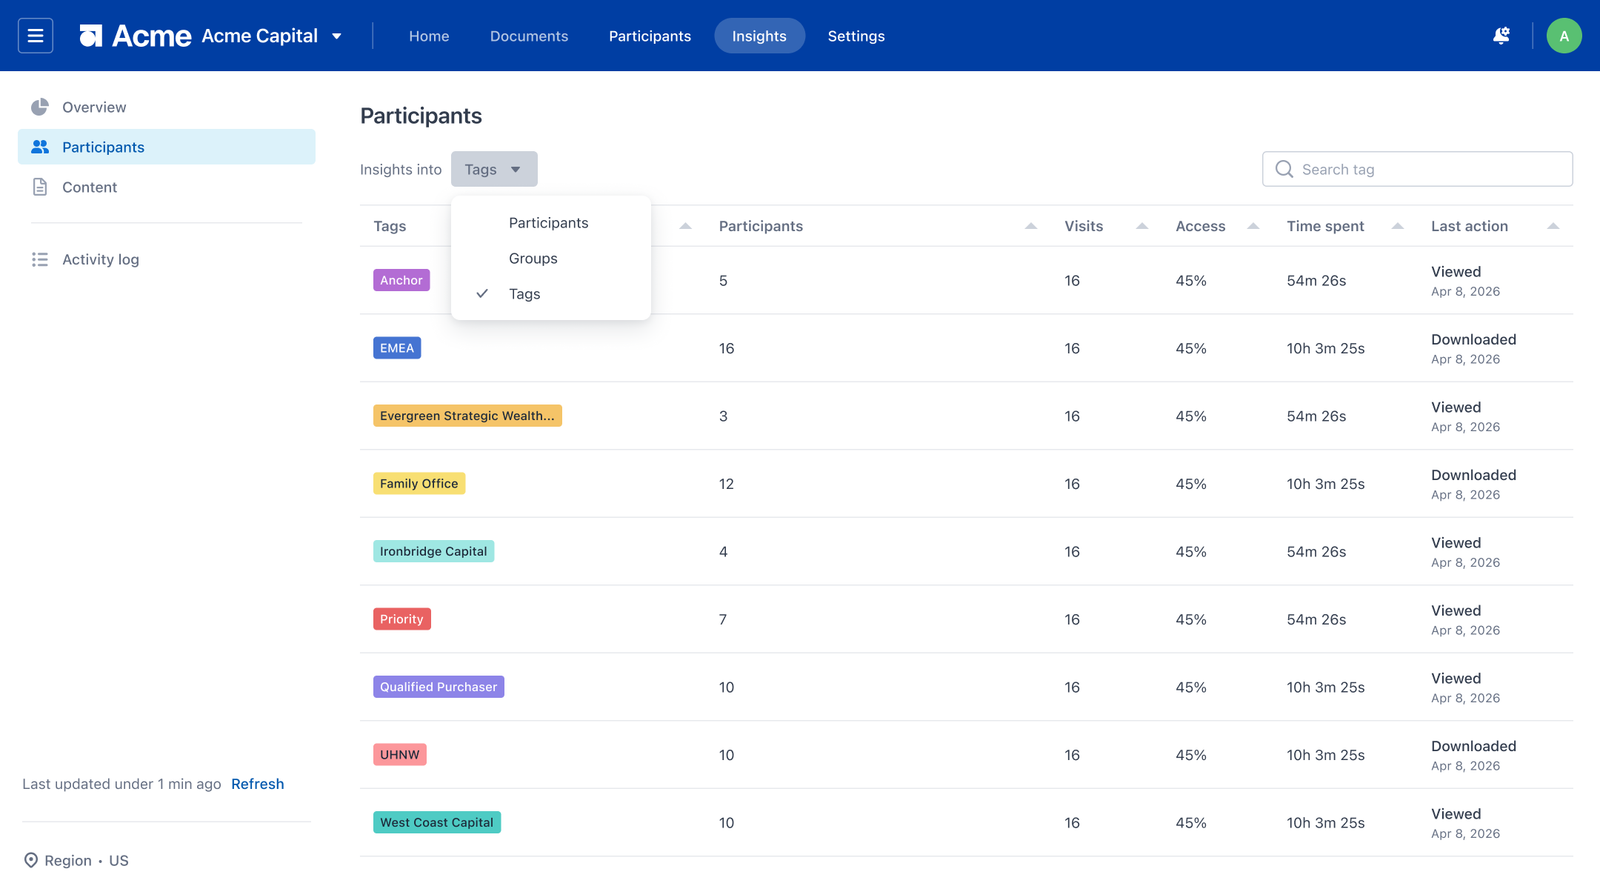
- The Insights dropdown gains Tags as a third view alongside Participants and Groups. Switching views replaces the entire table.
- The Participants view gains a Tags column and the tag filter.
The Tag insights modal
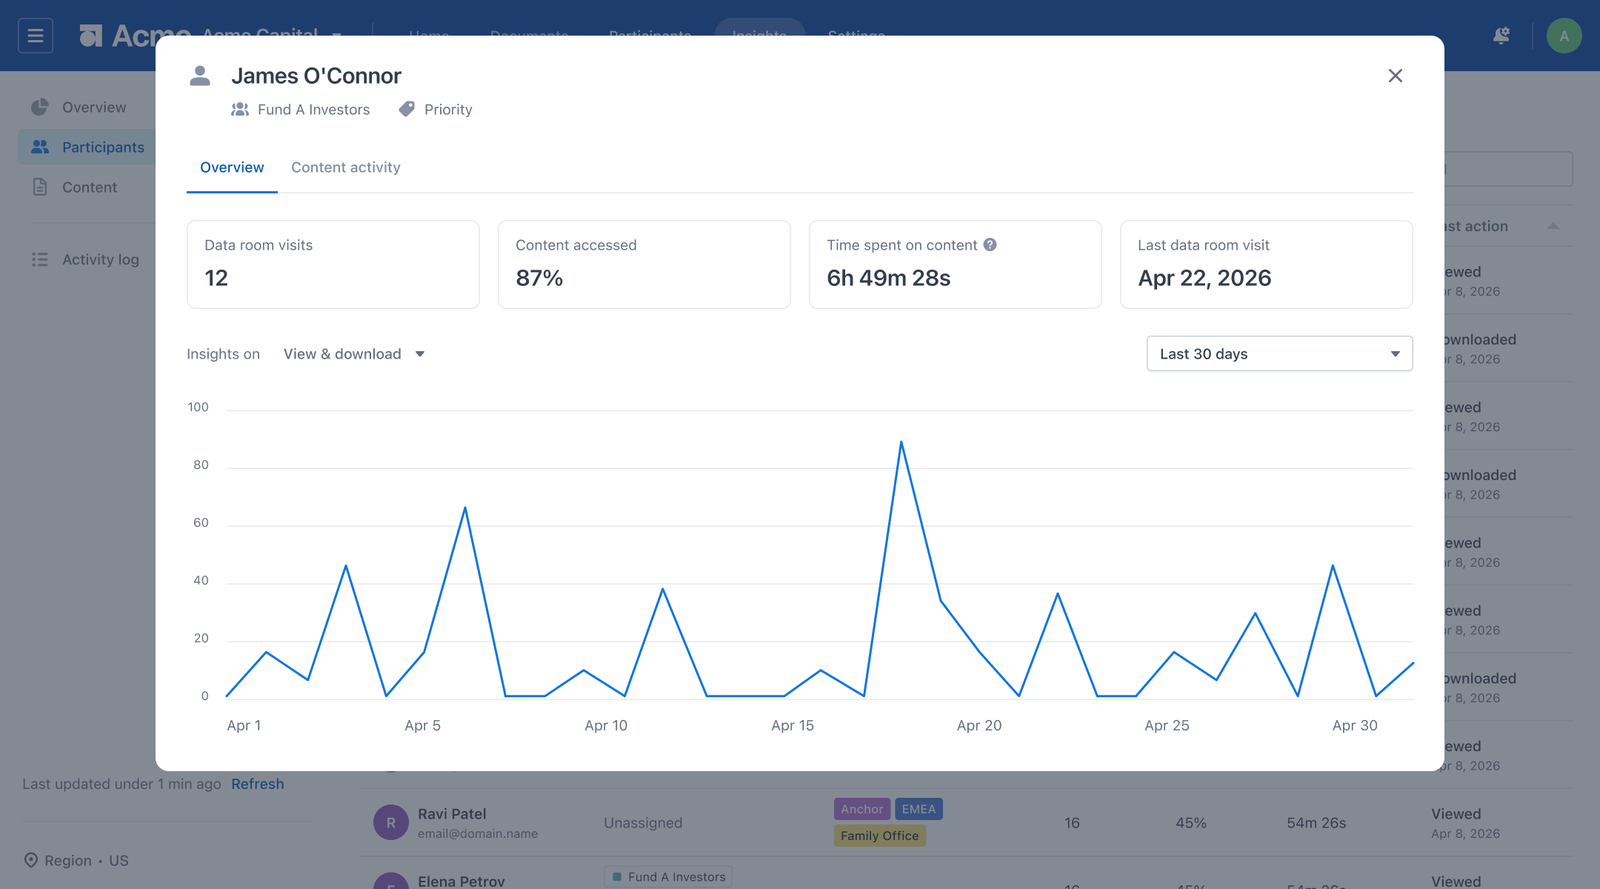
Click any tag row in an Insights table to open the Tag insights modal. It mirrors the participant and group modals: a header with the tag icon, tag name, and participant count, plus Overview cards (data room visits, content accessed, time spent, last visit) and a Content activity tab showing files accessed by participants carrying that tag.
FAQ
Why is the Tags option greyed out in Insights?
Because no tags exist in the data room yet. The Tags view and the Most active → Tags option both enable as soon as you create your first tag.
Do participants or LPs see the tags I assign?
No. Tags are an admin-only operational label. They appear only in admin-facing views — the participant table, Insights, exports, and the recipient picker — never to the participants themselves.
What happens to a tag when I rename it?
The new name applies everywhere that tag is used, across all participant records, and the tag re-sorts to its new alphabetical position. A success toast confirms the change.