

Import participants from a spreadsheet
Who this is for: Data Room Admins inviting more than a handful of participants at once. What you'll do: Download a customized template, fill in emails and
Who this is for: Data Room Admins inviting more than a handful of participants at once.
What you'll do: Download a customized template, fill in emails and group assignments, upload it back, and invite everyone in a single batch.
How long: ~5 minutes for the import itself; the system handles the heavy lifting in the background.
When to use this
Use spreadsheet import when you're:
- Bringing a list of investors from your CRM or internal HR roster into the Data Room
- Adding 10+ participants at once — manually inviting one-by-one is slow at this scale
- Re-using a participant list you already maintain in Excel or Google Sheets
If you only need to invite a few people, the existing Invite / Add Investor flow is still the fastest option.
Before you start
A few things to know up front:
- You need the Admin role on the data room. The import option only appears for admins.
- The groups you'll assign people to must already exist in the data room. The import won't create new permission groups for you.
- Accepted formats: .xlsx, .xls, .csv.
How to import participants
The import opens as a full-page wizard that replaces the Participants tab while you're in it. You can close it (✕) or back out (←) at any time without sending invites — nothing is submitted until you confirm on the final step.
Step 1 — Download the template
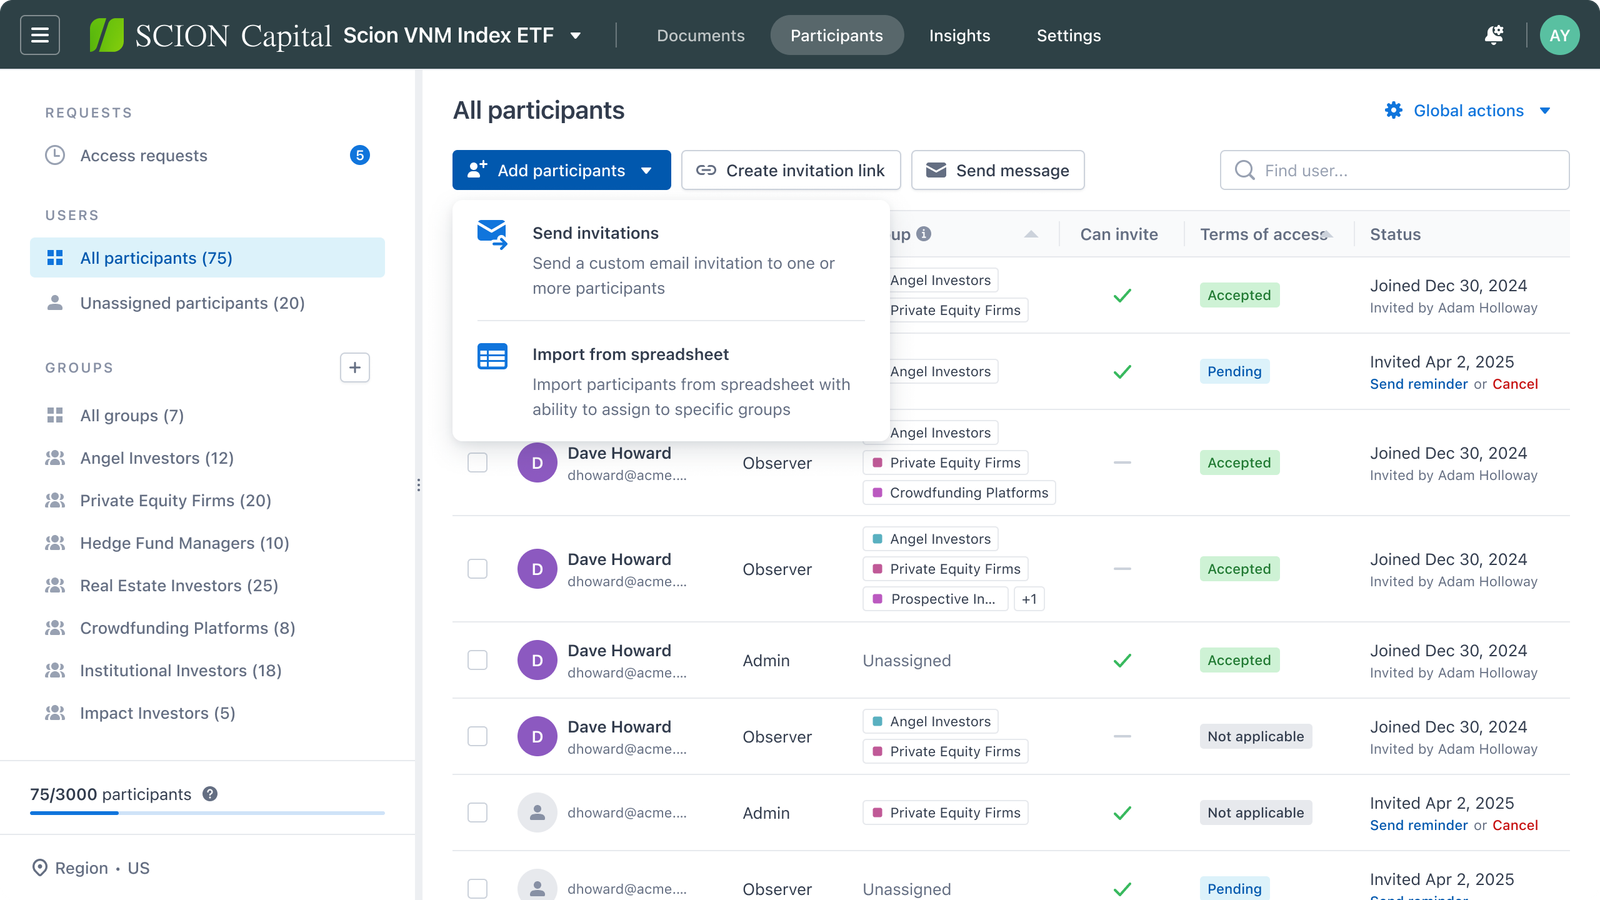
- On the Participants tab, open the Add participants dropdown.
- Choose Import from spreadsheet
- Click Download customized template.
- In the Customize template popup, search and tick the permission groups you want columns for, then click Create template.
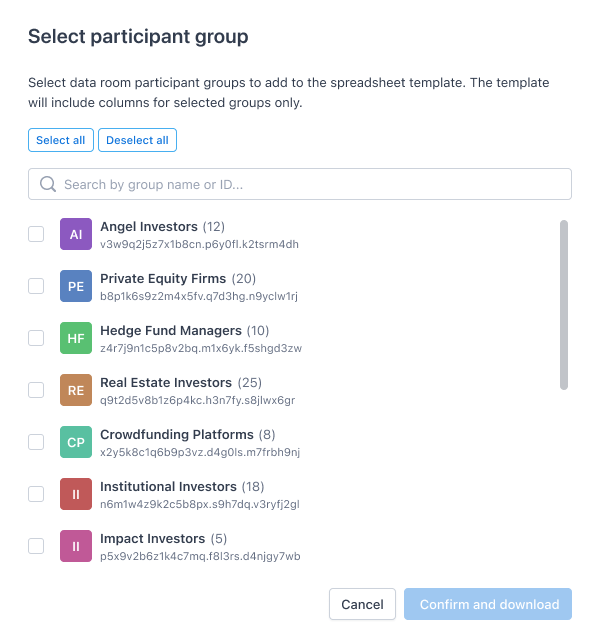
The template downloads as an .xlsx file. Each group you selected becomes its own column in the file.
💡 Pro tip: Only check the groups you actually plan to assign people to. Fewer columns = simpler file = fewer chances for someone to mark the wrong one.
Step 2 — Fill in the template
Open the downloaded file in Excel, Google Sheets, or any spreadsheet tool. The rules:
- Email column — required. One email per row. Must be a valid email format.
- Group columns — type
xin the cell where you want the person to belong. Leave blank to skip that group. - Can Invite Users column — type
xif the participant should be able to invite others. - Term of Access column — type
xif the participant should be subject to your data room's Term of Access (NDA) acceptance. - Group ID — every group column header includes a Group ID. Do not edit or delete the Group ID — that's how the import recognizes which group is which.
- Removing groups — if you don't want a group in your import, delete the entire column. Don't just blank out the values.
Save the file as .xlsx, .xls, or .csv when you're done.
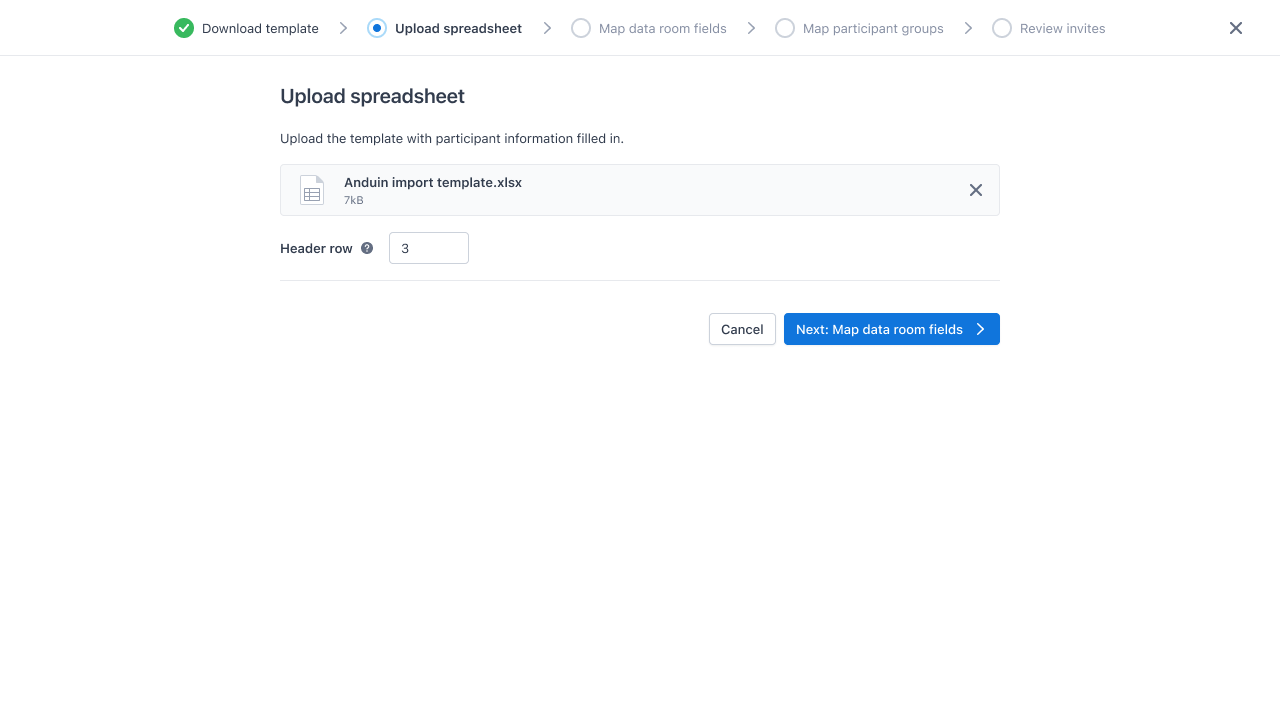
Step 3 — Upload your files
Drag the file onto the upload area or click to browse.
- If the file can't be read—for example, if a group column header contains a Group ID the Data Room doesn't recognize—an upload-error dialog appears. Fix the offending column in your spreadsheet (most often by re-downloading a fresh template for this data room) and re-upload.
Step 4 — Map fields
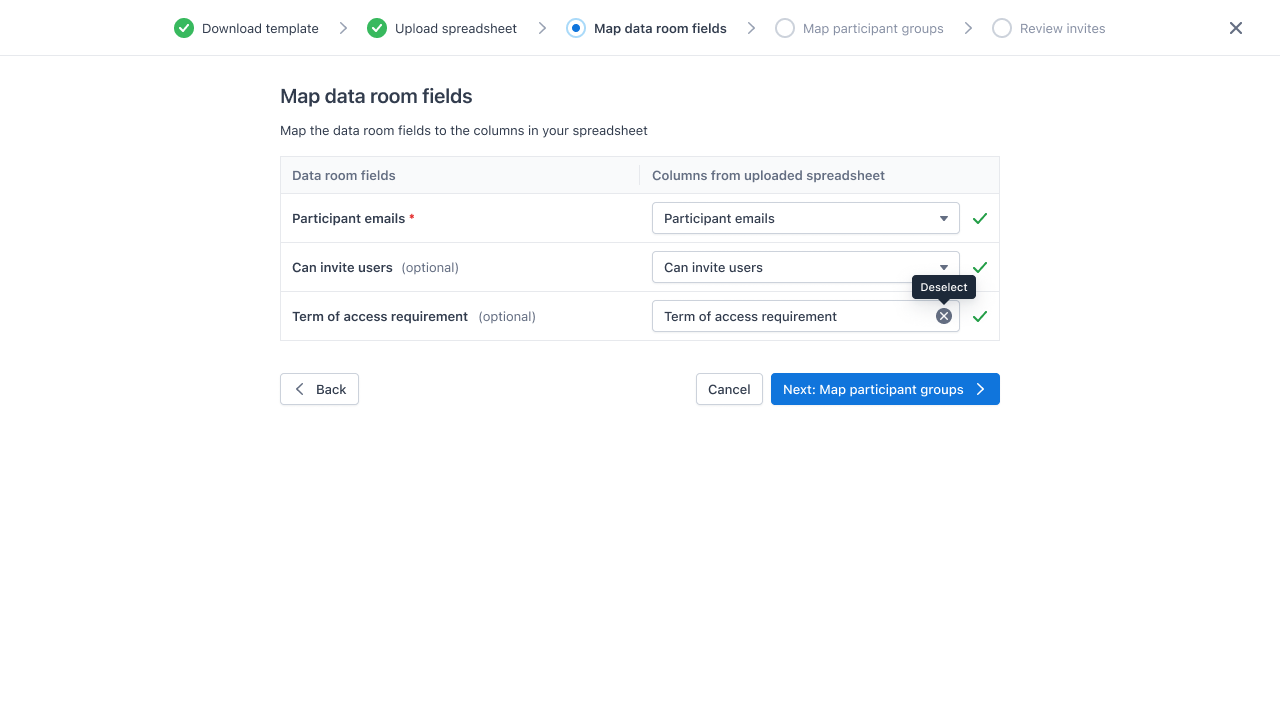
The wizard displays the columns it detected from your file. Review each one before moving on:
- Email column — confirm the wizard has identified the correct column as the email field.
- Can Invite Users and Term of Access — shown if detected in your file. Confirm or deselect as needed.
When everything looks right, click Next. You'll briefly see an "AI mapping in progress…" overlay while the wizard auto-detects which spreadsheet columns map to which permission groups. This usually takes a few seconds.
Step 5 — Map groups
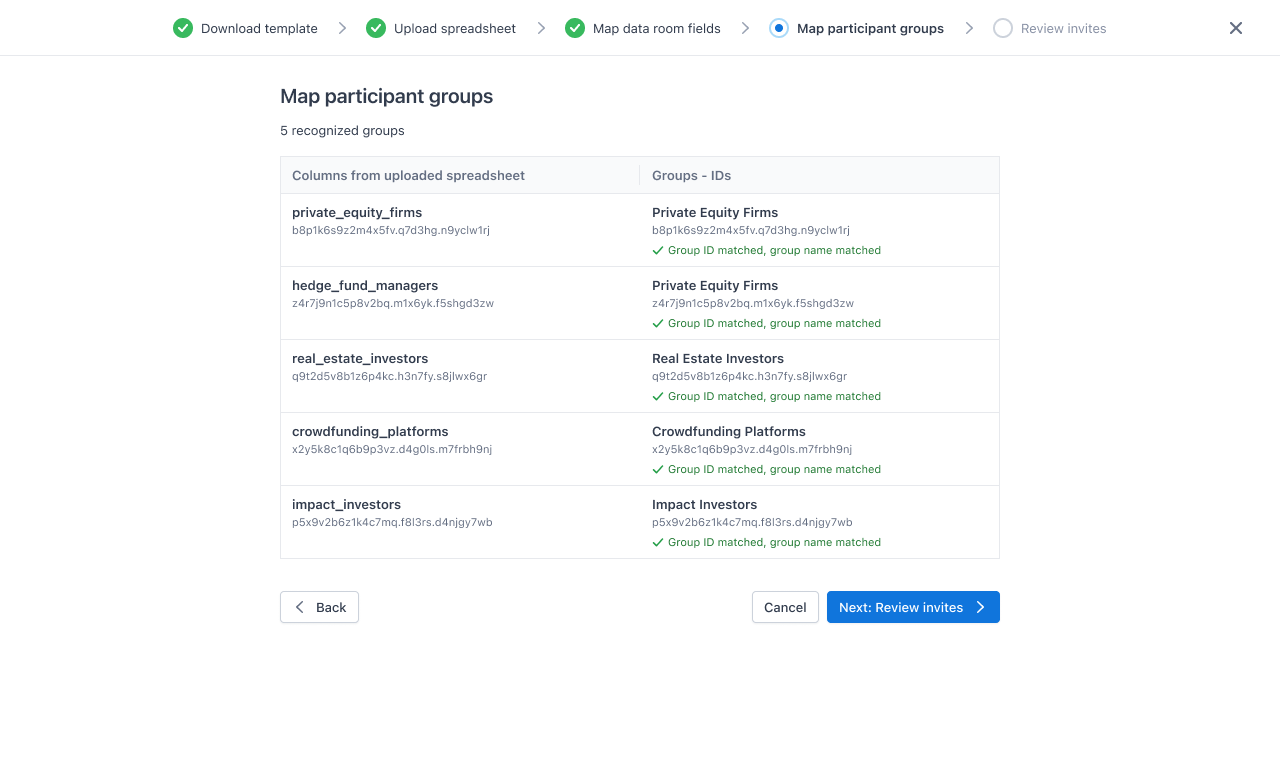
The wizard lists each permission group column detected from your file alongside the matching group in this data room. Confirm the mapping is correct for every group before continuing.
Step 6 — Map participants
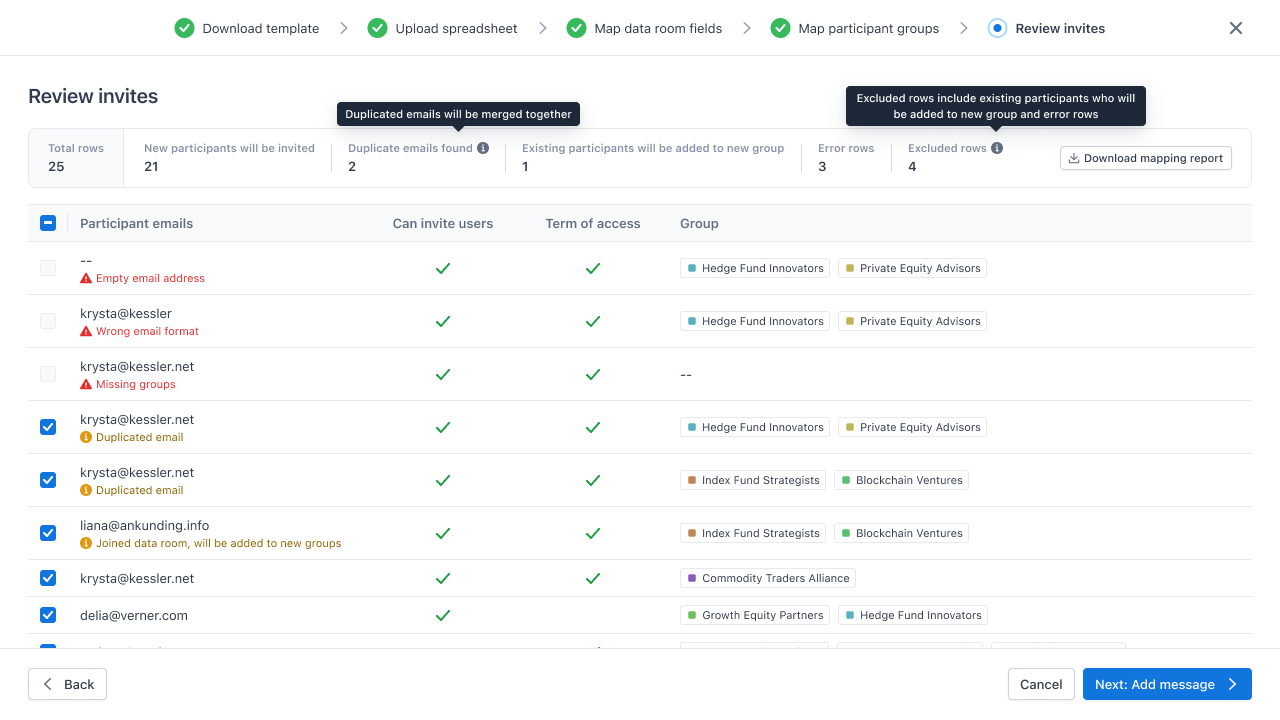
The wizard shows the full list of participants detected from your file, with their assigned groups. Before confirming:
- Check the list — review emails and group assignments. Rows with issues (invalid email, no group assigned) are flagged.
- Exclude rows — uncheck any participant you don't want to import in this batch.
- Download the User Mapping Report — if any participants couldn't be mapped, download the report to see who was affected and why, then fix your file and re-import if needed.
When the list looks right, click Next.
Step 7 — Review and confirm
The final screen is a summary of what's about to happen:
- Total rows in your file
- How many people will be newly invited
- How many existing participants will be added to new groups
- Merged rows (duplicate emails combined)
- Skipped/error rows
- A grouped participant list — expand any group to see exactly who's going in
If anything looks off, click Back to fix it. When you're ready, click "Send N invitations" / "Add N participants".
Step 8 — Review and confirm
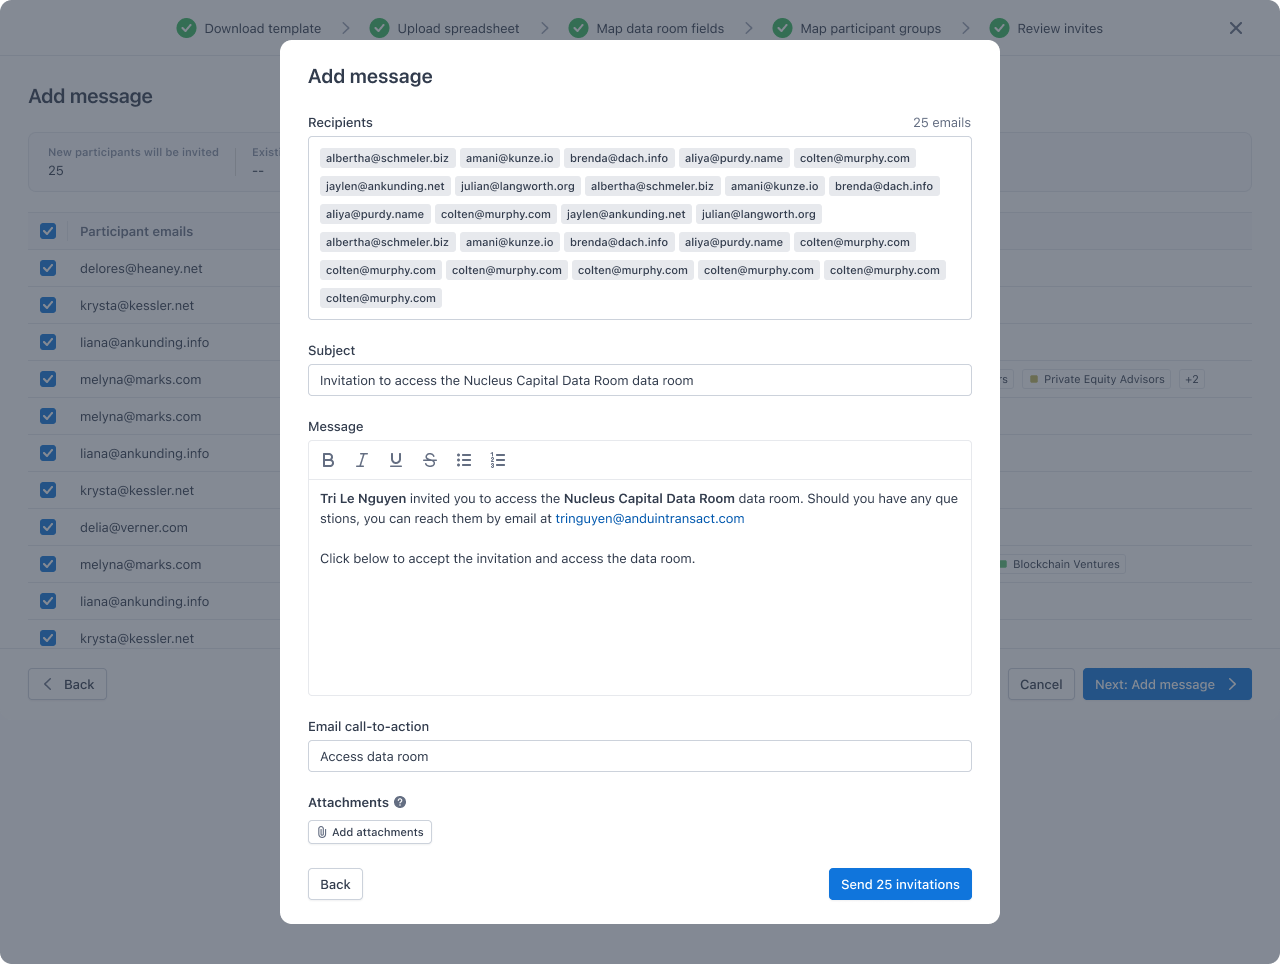
After you confirm the Review, an Add message modal opens. This is the last step before participants are actually invited.
- Customize the invitation email — edit the message body that recipients will see in their invitation.
- Add attachments — attach any files you want to include with the invitation (for example, a welcome letter or NDA reminder).
- Send — when you're ready, send the invitations. Existing participants who are only being added to new groups will not receive a new invitation email.
What happens after you confirm
The import runs as a background batch job. You'll see a batch panel with:
- Live progress (e.g. "Importing 87 of 200…")
- A Partial Report download you can grab mid-run
- The ability to navigate away and come back—the panel persists
When the run finishes, the Full Report becomes available (and the Partial Report download is no longer offered, since the Full Report supersedes it).
Reports you can download
| Report | When it's available | What's in it |
|---|---|---|
| Partial Report | During the async run | Rows that were skipped during validation (invalid emails, no-group, etc.) |
| Full Report | After the run completes | Every row has a status—success, skipped, or error |
Common errors and what they mean
| What you'll see | What it means | What to do |
|---|---|---|
| Empty email | A row has no email address | Either add an email or delete the row |
| Invalid email format | The email doesn't look like a real address (e.g. foo@ or notanemail) | Fix the email or delete the row |
| No group assigned | A valid email but no “x” in any group column | Mark at least one group, or delete the row if you didn't mean to include them |
| Duplicate email—merged (yellow badge, not an error) | The same email appears in multiple rows | Nothing to do. The wizard combines all group assignments onto a single participant |
| Already exists in this Data Room (informational note) | The email belongs to someone already invited | Nothing to do. They'll be added to any new groups in your file. Existing groups are kept |
FAQ
Can the import create new permission groups for me? Not yet. Groups must exist in the data room before import. If you need a new group, create it in Permissions first, then come back to the import flow.
Can I cancel a running import? Yes, you can cancel mid-run. Only participants with completed processes will be added to the data room and groups
Can I reuse a template across multiple data rooms? Group IDs are unique per data room, so a template generated in Data Room A won't auto-match groups in Data Room B. Always download a fresh template per data room.
Will existing participants get a new invitation email? No. If an email already exists in the data room, the import only adjusts their group memberships—it doesn't send a fresh invitation. New emails get a regular invite.